Forest Master – Frequently Asked Questions
Explore a range of frequently asked questions regarding our equipment, as well as general log splitting, gardening and forestry-related questions. Is your question not here? Submit a question by emailing us at info@forest-master.com.
15HP Wood Chipper (FM15WC)
Last Updated on August 6, 2020 by Forest Master
You should perform regular maintenance checks on your wood chipper. This is the best way to ensure optimal performance and long life of your machine.
First Time Use
Ensure that you check the tension of the belts before first time use. You should then run the chipper for no longer than 10 to 15 minutes before checking the tension of the belts again on your first use. After this you only need to check the tension of the belts before each chipping session.
Click here to learn how to adjust the belt tension.
Before Each Use
Check the engine oil level of the chipper
Check the general equipment condition
Check the tension of the blades
Check the blades for sharpness
Check emergency stop switch
After Every 25 Hours
Check the tire pressure
Clean the engine exterior and cooling
Change Engine Oil
Replace Air Filter
Every 100 Hours
Replace Spark Plug
Last Updated on August 6, 2020 by Forest Master
The tension of the belts should be checked before each use. Additionally, when the machine is new or after the belts have been replaced, the tension should be checked after the first 15 minutes of use as the belts will stretch.

To adjust the tension loosen the four mounting bolts that secure the engine plate to the chipper. The plate can then be moved backwards or forwards using the two adjusting bolts. To adjust the bolts, loosen the lock nuts then move the adjusting bolts backwards or forwards the required amount.
Once the adjustment is correct, you can then tighten the lock nuts. You should be careful to adjust each bolt by the same amount.
Finally, re-tighten the four mounting bolts.
Last Updated on August 6, 2020 by Forest Master
In the event that your wood chipper won’t start, please follow this checklist:
Is the ignition switch in the ‘ON’ position?
Is the fuel shut-off valve on?
Are you using fresh, clean fuel? If the fuel is old, change it. Use a fuel stabilizer if you keep fuel longer than 30 days.
Is the spark plug clean? If the spark plug is dirty or cracked, change it. If it’s oily, leave it out, hold a rag over the plug hole and pull the recoil cord several times to blow out any oil in the cylinder, then wipe off the plug and reinsert it.
Is there sufficient oil? Check the engine oil level and if necessary top up to the current level.
Is there dirt in the carburetor? Undo the bolt holding the float chamber to the carburetor, empty out any fuel and clean the inside using fresh clean petrol. Remove the jet in the bottom of the carburetor and clean it. Refit the jet and the float chamber.
If you’ve been through each step of this checklist and you’re still experiencing issues, then please give us a call on our technical line on 0191 276 6553 or email us at technical@forest-master.com.
Last Updated on August 6, 2020 by Forest Master
In the event that your wood chipper won’t start, please follow this checklist:
Check that the Throttle Lever is in the ‘RUN’ position
Is the air filter clean? If it’s dirty, change it by following the instructions provided in the engine manufacturer’s owner’s manual.
Is the spark plug clean? If it’s fouled or cracked, change it. If it’s oily, leave it out, hold a rag over the plug hole and pull the recoil cord several times to blow out any oil in the cylinder, then wipe off the plug and reinsert it.
Are you using fresh and clean unleaded gas? If it’s old change it. Use a fuel stabilizer if you keep gas longer than 30 days.
Does your engine have the right amount of clean oil? If it’s dirty, change it following the instructions provided in the engine manufacturer’s owner’s manual.
Check the oil level and adjust as needed.
If you’ve been through each step of this checklist and you’re still experiencing issues, then please give us a call on our technical line on 0191 276 6553 or email us at technical@forest-master.com.
Last Updated on August 6, 2020 by Forest Master
In the event that your wood chipper engine is producing smoke, please follow this checklist:
Check the oil level and adjust as needed.
Check the air filter and clean or replace if needed.
You may be using the wrong oil – too light for the temperature. We recommend reading the Engine Owner’s manual for more detailed information regarding this subject.
Clean the cooling fans if they’re dirty.
If you’ve been through each step of this checklist and you’re still experiencing issues, then please give us a call on our technical line on 0191 276 6553 or email us at technical@forest-master.com.
Last Updated on August 11, 2020 by Forest Master
The belts turning or moving out of place means that the pulleys are out of alignment.
Check the lower to upper pulley using a spirit level if possible. You can easily move over the engine by loosening the 4 bolts.
Last Updated on September 16, 2020 by Forest Master
If you’re starting the 15HP Wood Chipper with the electric start while the engine is cold, be sure to set the choke level to full choke. When you start the engine you should then let it run at low throttle for around 30 seconds before you begin to slowly increase the throttle level.
If you’re starting the 15HP Wood Chipper with the electric start while the engine is warm, set the choke level to around half (middle choke position). When the engine has started, you should still let the chipper run at low throttle for around 30 seconds before you start to slowly increase it.
6.5 Wood Chipper (FM6.5WC)
Last Updated on July 22, 2020 by Forest Master
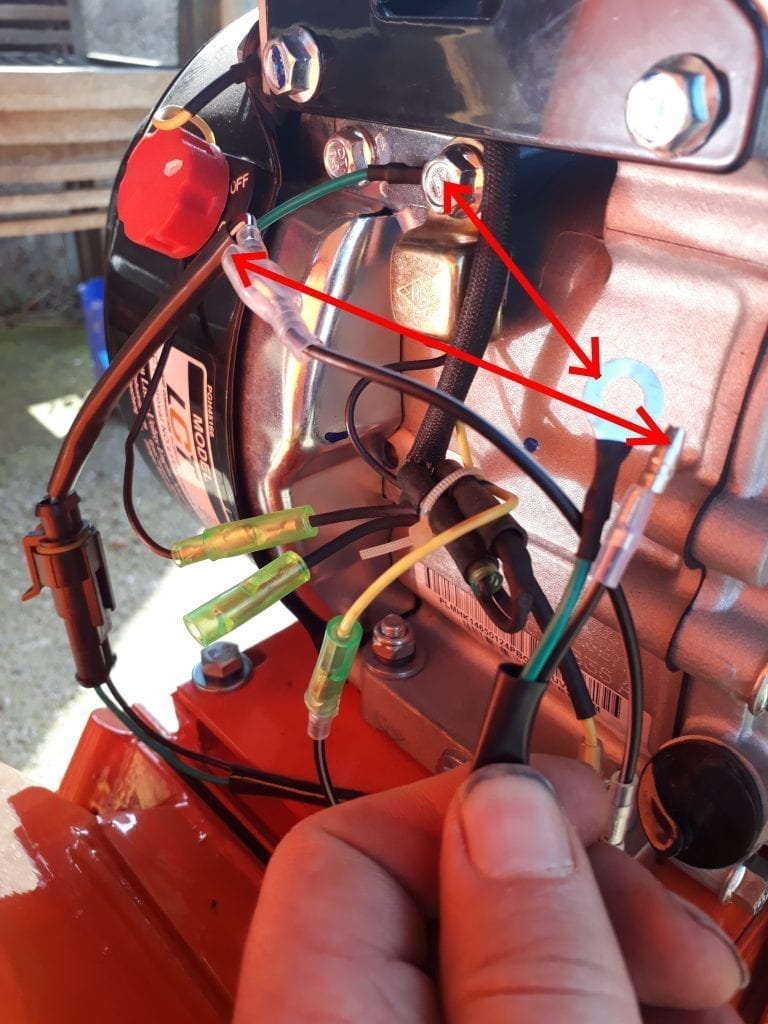
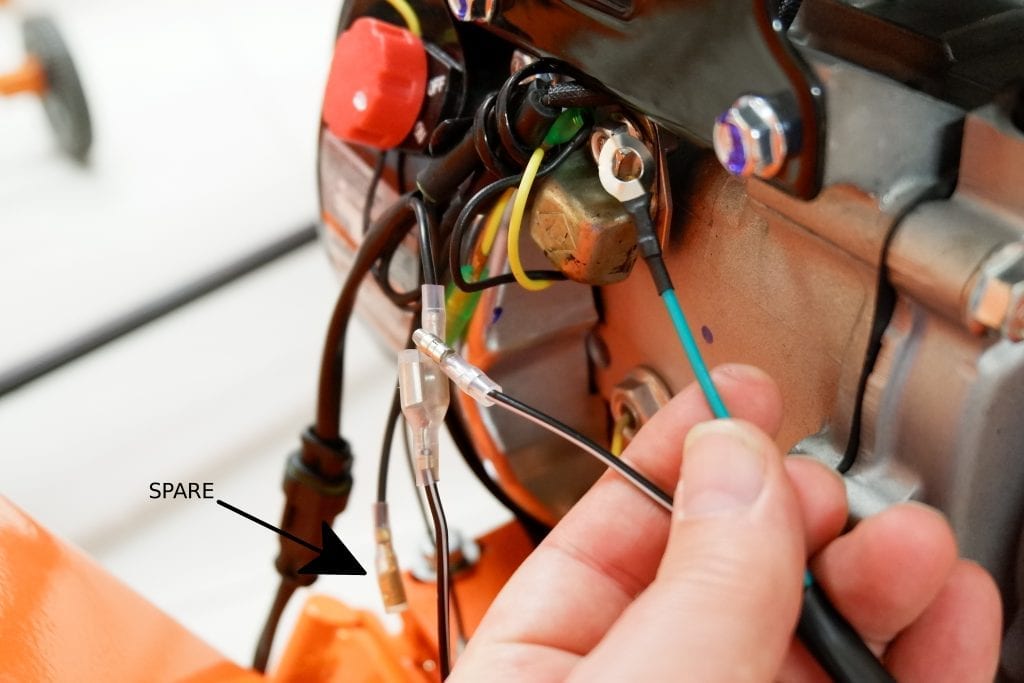
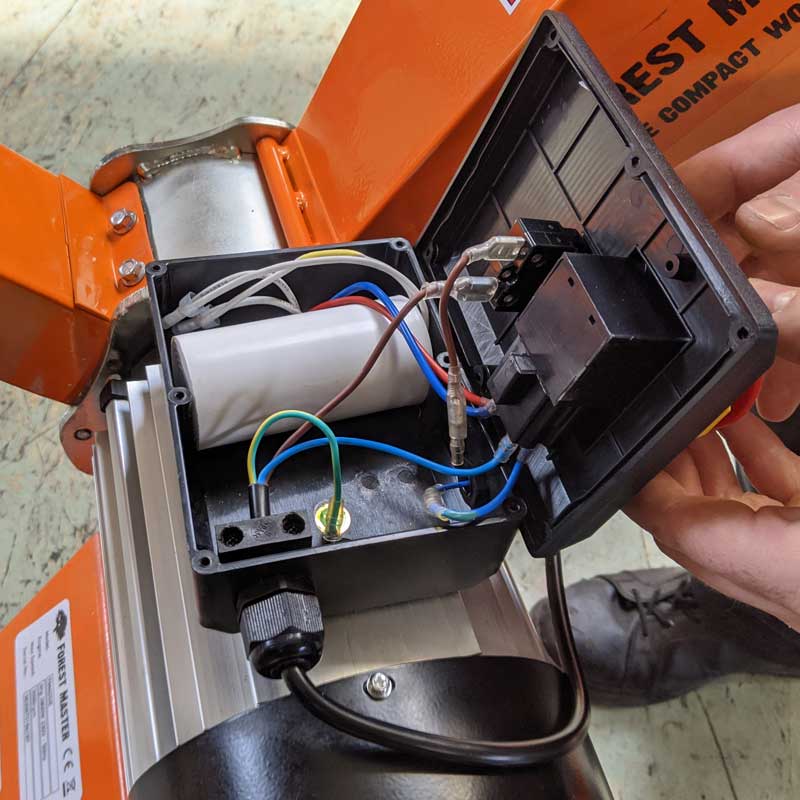
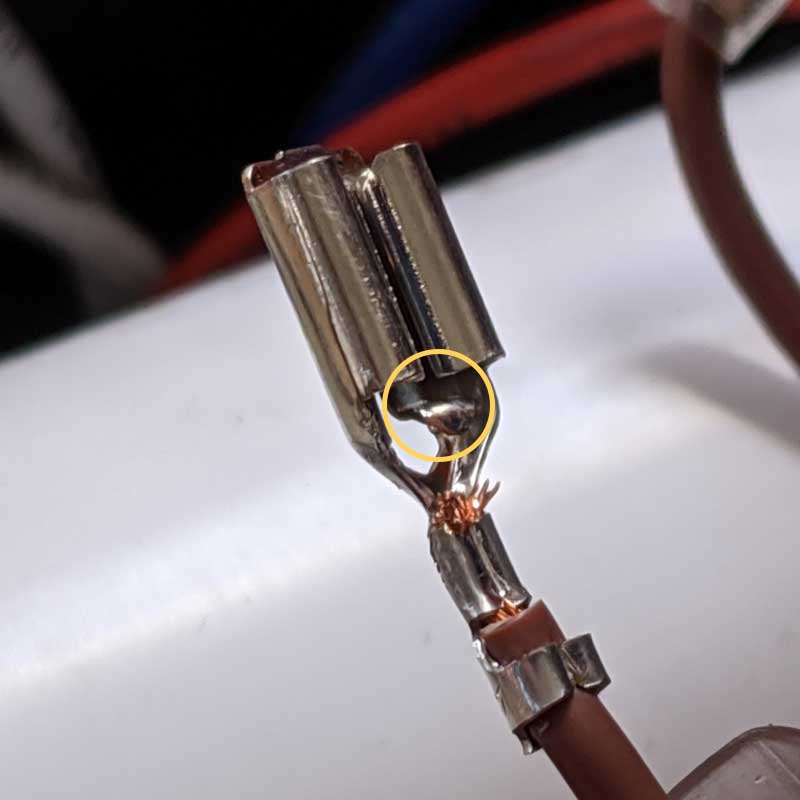
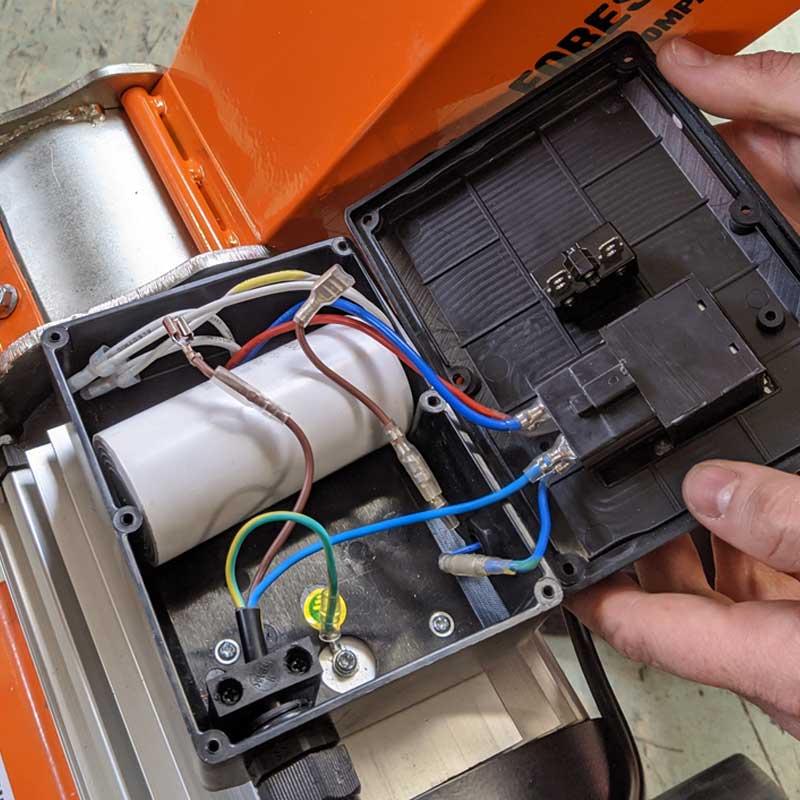
There should be two wires from the microswitch/hopper opening switch, a male bullet connector and a “washer connector”.
The “washer connector” is an earth and the bullet connector goes to one side of a double female connector.
Follow the below images to view where the wires should connect.
Last Updated on August 6, 2020 by Forest Master
You should perform regular maintenance checks on your wood chipper. This is the best way to ensure optimal performance and long life of your machine.
First Time Use
Ensure that you check the tension of the belts before first time use. You should then run the chipper for no longer than 10 to 15 minutes before checking the tension of the belts again on your first use. After this you only need to check the tension of the belts before each chipping session.
Click here to learn how to adjust the belt tension.
Before Each Use
Check the engine oil level of the chipper
Check the general equipment condition
Check the tension of the blades
Check the blades for sharpness
Check emergency stop switch
After Every 25 Hours
Check the tire pressure
Clean the engine exterior and cooling
Change Engine Oil
Replace Air Filter
Every 100 Hours
Replace Spark Plug
Last Updated on August 6, 2020 by Forest Master
The tension of the belts should be checked before each use. Additionally, when the machine is new or after the belts have been replaced, the tension should be checked after the first 15 minutes of use as the belts will stretch.

To adjust the tension loosen the four mounting bolts that secure the engine plate to the chipper. The plate can then be moved backwards or forwards using the two adjusting bolts. To adjust the bolts, loosen the lock nuts then move the adjusting bolts backwards or forwards the required amount.
Once the adjustment is correct, you can then tighten the lock nuts. You should be careful to adjust each bolt by the same amount.
Finally, re-tighten the four mounting bolts.
Last Updated on August 6, 2020 by Forest Master
The first step to starting up your chipper is to position the wood chipper on flat, dry ground and made sure the machine cannot be moved.
Then make sure that the Fuel Shut-Off Valve is in the ‘ON‘ position.
Move the Choke Control Lever to the ‘CHOKE‘ position (this is only required if the engine is cold).
Move the throttle control lever to the ‘FAST‘ position.
Turn the Ignition Switch to the ‘ON’ position. Grasp the Recoil Starter Handle and slowly pull until you feel resistance. Let the cord retract a little bit then pull the cord rapidly to start the engine. One or two pulls usually starts the engine.
Move the Choke Control Lever (if used for a cold engine) slowly back to the ‘RUN‘ position when the engine is running well.
If the wood chipper has not been running (cold engine), warm up the engine by running the engine at half throttle for 3 – 4 minutes, then advance the engine throttle control to the maximum speed.
When you’d like to stop the engine.
Simply move the throttle lever to ‘IDLE‘ and then turn the Ignition Switch to the ‘OFF’ position.
Last Updated on August 6, 2020 by Forest Master
In the event that your wood chipper won’t start, please follow this checklist:
Is the ignition switch in the ‘ON’ position?
Is the fuel shut-off valve on?
Are you using fresh, clean fuel? If the fuel is old, change it. Use a fuel stabilizer if you keep fuel longer than 30 days.
Is the spark plug clean? If the spark plug is dirty or cracked, change it. If it’s oily, leave it out, hold a rag over the plug hole and pull the recoil cord several times to blow out any oil in the cylinder, then wipe off the plug and reinsert it.
Is there sufficient oil? Check the engine oil level and if necessary top up to the current level.
Is there dirt in the carburetor? Undo the bolt holding the float chamber to the carburetor, empty out any fuel and clean the inside using fresh clean petrol. Remove the jet in the bottom of the carburetor and clean it. Refit the jet and the float chamber.
If you’ve been through each step of this checklist and you’re still experiencing issues, then please give us a call on our technical line on 0191 276 6553 or email us at technical@forest-master.com.
Last Updated on August 6, 2020 by Forest Master
In the event that your wood chipper won’t start, please follow this checklist:
Check that the Throttle Lever is in the ‘RUN’ position
Is the air filter clean? If it’s dirty, change it by following the instructions provided in the engine manufacturer’s owner’s manual.
Is the spark plug clean? If it’s fouled or cracked, change it. If it’s oily, leave it out, hold a rag over the plug hole and pull the recoil cord several times to blow out any oil in the cylinder, then wipe off the plug and reinsert it.
Are you using fresh and clean unleaded gas? If it’s old change it. Use a fuel stabilizer if you keep gas longer than 30 days.
Does your engine have the right amount of clean oil? If it’s dirty, change it following the instructions provided in the engine manufacturer’s owner’s manual.
Check the oil level and adjust as needed.
If you’ve been through each step of this checklist and you’re still experiencing issues, then please give us a call on our technical line on 0191 276 6553 or email us at technical@forest-master.com.
Last Updated on August 6, 2020 by Forest Master
In the event that your wood chipper engine is producing smoke, please follow this checklist:
Check the oil level and adjust as needed.
Check the air filter and clean or replace if needed.
You may be using the wrong oil – too light for the temperature. We recommend reading the Engine Owner’s manual for more detailed information regarding this subject.
Clean the cooling fans if they’re dirty.
If you’ve been through each step of this checklist and you’re still experiencing issues, then please give us a call on our technical line on 0191 276 6553 or email us at technical@forest-master.com.
Last Updated on August 11, 2020 by Forest Master
The belts turning or moving out of place means that the pulleys are out of alignment.
Check the lower to upper pulley using a spirit level if possible. You can easily move over the engine by loosening the 4 bolts.
6HP Petrol Mulcher (FM6DD-MUL)
Last Updated on July 30, 2021 by Forest Master
Wood is too dried out
The compact chipper series is designed primarily for chipping freshly cut wood. The FM6DD has been tested thoroughly chipping freshly cut hawthorn wood (slow-grown hardwood).
We recommend that the wood is chipped no longer than three days after cutting. After this date, the wood will begin to dry out, meaning the chipper blades then struggle to dig into the wood. This produces a sawdust-like waste from the exit chute, and the chipper will struggle to self-feed.
If the chipper is producing sawdust – this is a clear sign that the wood is dry. When chipping slow-grown hardwood like fruit trees (such as cherry or apple trees) you must ensure that you chip the material the same day that it is cut to ensure the machine operates at full effectiveness.
Last Updated on August 10, 2021 by Forest Master
This largely depends on the hardness of the wood you’re chipping. The harder the wood, the quicker the blades will need to be replaced.
However, the chipper is equipped with twin reversible blades. The reversible blades mean that you can simply switch the blades around when the first set start to dull, so you get a much longer life span on the blades.
We also stock spare blades on our website, should you need to have them replaced.
You can also sharpen your blades using an oil stone. Simply sharpen the edges of the blade, do not worry about taking out any dents or marks.
Last Updated on March 8, 2021 by Forest Master
The following is an addendum to the manual provided with the garden mulcher (8th March 2021)
Complete steps 1-4 of the FM6DD-MUL assembly instruction manual as usual. Before completing step 5 of the manual, perform the following instructions written below.
(1) First, place the engine/motor unit on its side as demonstrated in the image displayed below. Please ensure that the engine has not been filled with oil or petrol at this time.

(2) You can now slide the discharge chute into the mulcher drum. The upper flange of the discharge chute should slide in above the bolt as displayed in the image to the left.

(3) After sliding the discharge chute into place, you can then secure and fasten the chute using the necessary M6 bolts (50), M6 spring washers (59) and M6 washers (41).

(4) After completing the aforementioned steps, you can then lift the engine/motor unit with the attached discharge chute on to the base of the mulcher and continue with the manual as standard.

Last Updated on March 16, 2021 by Forest Master
The mulcher is perfectly capable of receiving and processing wood branches, sticks etc. The material produced by the machine however will be 10mm down – you will not receive large wood chips from the wood placed into the machine. If you wish to process wood into wood chips, then you will require our wood chipping accessory kit for the mulcher.
Last Updated on May 4, 2021 by Forest Master
The FM6DD-MUL is perfectly capable of processing both paper and cardboard. However, cardboard can take the edge off the blades quicker than when using the mulcher to process standard green waste. If you see a drop in performance in the machine after processing cardboard, it’s likely because the sharp edge has been removed from the blades.
These blades can be sharpened using an angle grinder or you can purchase spare replacement blades directly from ourselves. Remember that the blades are also reversible so once one side dulls, you can simply reverse the blades over and use a fresh set.
Last Updated on May 4, 2021 by Forest Master
If you have been working with wet material – you may wish to wash down the machine using a hosepipe. To perform this simply spray water down into the mulcher hopper feed while the engine is running. After you have finished hosing the mulcher down – leave the engine running for a few minutes to allow the machine to dry itself off.
Last Updated on August 9, 2021 by Forest Master
We have been made aware of an issue concerning the rotation of the mulcher drum. This issue is caused by the washer under the head of the bolts not being correctly flattened. Once these have been correctly flatted it leaves a gap that allows you to rotate the drum housing.
In order to solve this, tighten the three adjusting bolts on the drum and then loosen the three nuts until they are very loose. This should allow you to then adjust the angles and retighten at the angle you require.
Last Updated on November 6, 2024 by Forest Master
All LCT petrol engines used on Forest Master products are compatible with E10 fuel. However as chippers and mulchers tend to be used infrequently, we strongly recommend that you add a fuel stabiliser to E10 or use a fuel that has been blended for use in garden equipment.
If unstabilised E10 fuel is left in the engine for a period without the engine being used then it evaporates and leaves a powdery residue in the fuel lines and carburettor. When you next use the engine, the powdery residue can get into the carburettor jet causing fuel starvation problems and requiring the carburettor to be fully cleaned.
If you do not use a fuel stabiliser or a specially blended fuel then before storing the machine for more than a few weeks, you need to drain it of all fuel and clean and dry the float bowl so there is no fuel left in it.
Delivery & Returns
Last Updated on April 17, 2020 by Forest Master
Unfortunately, once you place your order, we must send the goods to the delivery address supplied during the checkout process. Should you wish to change the address, you will need to cancel your order, then reorder with the correct delivery address.
Last Updated on April 17, 2020 by Forest Master
Majority of the UK mainland is free delivery, though there are some locations, along with off shore destinations, which require a small delivery fee to be paid. These are outlined in our Delivery Cost page, the delivery fee will be applied during the order process.
Some locations we can offer an express service, the cost of this service is also outlined on our Delivery Cost page. When you are in the checkout placing your order, if we offer the express service to your area, you will be presented with the option to upgrade your delivery service.
Last Updated on April 17, 2020 by Forest Master
When it comes to returns, we ask that you contact us first. In most cases, upgrading or downgrading is the best path to take. If upgrading or downgrading is not applicable in your case, we will happily provide you with a Returns Authorisation Number.
Once you have received the Return Authorisation Number, you will need too send the item back using a courier of your own choice, we recommend using courier comparison companies, such as Parcel2Go.
Once the item is returned, we will pair it with the paperwork we have, from issuing the Return Authorisation Number, and process a refund for the cost of the item.
For more information on returns, please view our Return Information page.
Last Updated on April 17, 2020 by Forest Master
This is a rare case, though if this should happen to you, please reject the delivery. You are entitled to reject the item, simply ask the driver how to do this. If you can, take some photographs of the damage.
Once you have rejected the item, please Contact Us so we can arrange a replacement to be sent out as quickly as possible.
Last Updated on April 17, 2020 by Forest Master
Please view our Delivery Information page for estimated delivery time scales.
Last Updated on July 21, 2020 by Forest Master
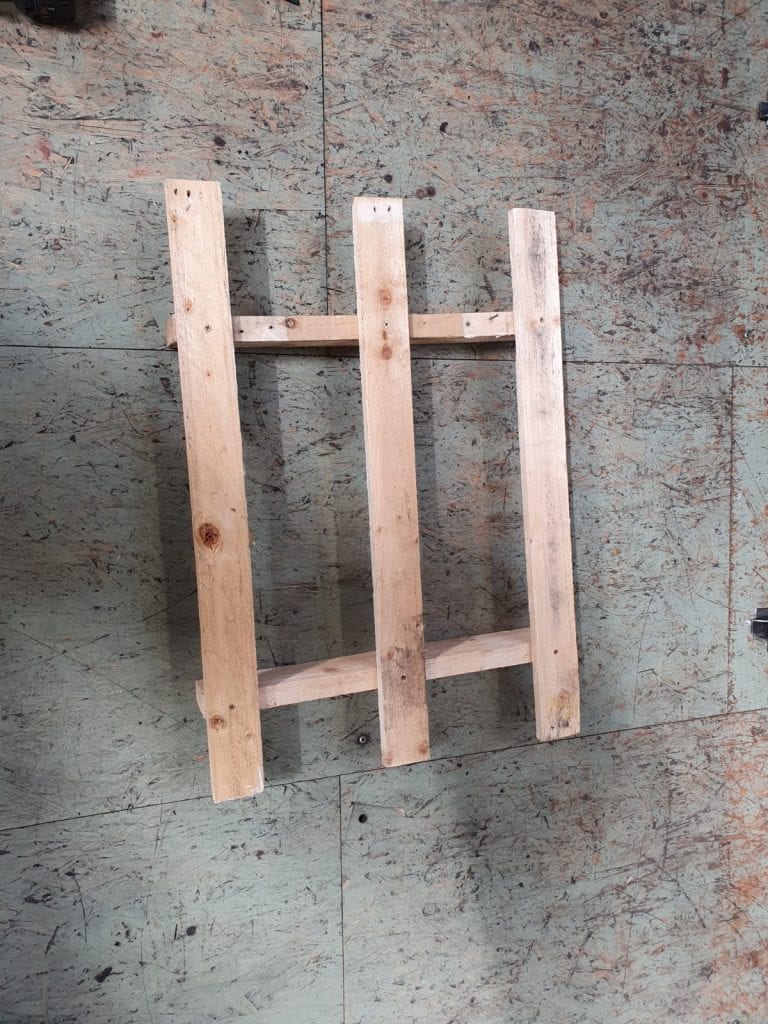
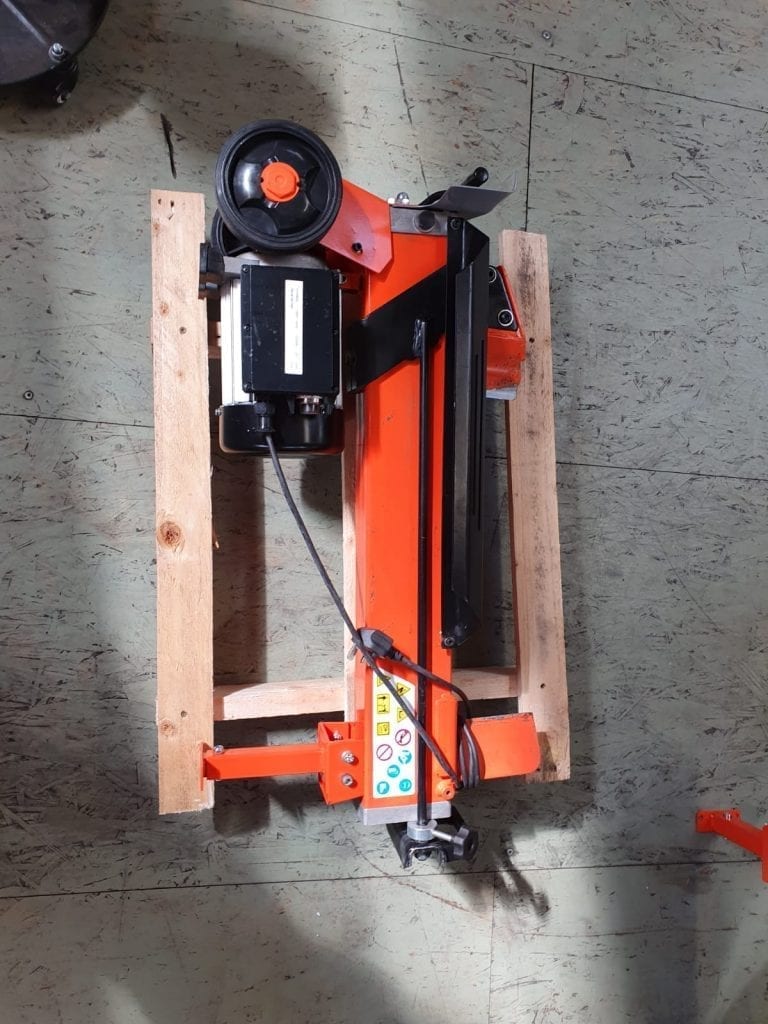
The log splitter must be strapped or tied to wood skids, or a pallet. You MUST also close the valve of the log splitter (air bleed valve located above the ram).
Last Updated on November 10, 2021 by Forest Master
International customers including EU states may be subject to import tariffs and taxes imposed by your own country As of 16.08.2021, all VAT and customs duties are paid for when placing the order on the website – you will not be charged extra VAT from your local customs office. The price paid on the website is the final cost of the item(s).
DUO10T Manual Log Splitter
Last Updated on July 16, 2020 by Forest Master
This is a rare occurrence which can be put down to a faulty pin which connects to the hand wheel, meaning the jack attempts to turn itself back.
Contact the dealer on +44 0191 265 5000 or Email Info@forest-master.com to arrange a new replacement pin to be sent out to you.
Last Updated on July 13, 2020 by Forest Master
First, the spring must be loosened from the bottom of the splitter. We’ve previously used heavy duty cable ties to do this. Tie the cable ties together, so that you can pull the cable ties back through the hole at the end of the process.
After loosening off the spring, you can then slide the bottom blade up the splitter, towards the hole at the back of the splitter, designed for tightening the blade.
We recommend tightening the bolts on the blade up fully, and then taking the bolts back half a turn.
You can then pull the spring back using the cable ties and hook the spring back on. This will tighten up the bottom blade and stop the blade moving at an angle.
Zero Hand Truck
Last Updated on April 17, 2020 by Forest Master
Zero Hand Truck are constantly looking at ways to improve their products, as such their first improvement is to change the springs used. These new springs and heavier duty than the previous ones used, as such they are tensioned correctly, without the need for the hand wheel screws.
Last Updated on July 20, 2020 by Forest Master
The newest editions of the Zero Hand Truck no longer require split pins. It’s likely that they’re still included within the packaging of your zero hand truck but the truck itself has been upgraded to no longer need them.
The wheels and cap are tight fitted to the truck to provide safe and secure operation of the zero hand truck. This design has been thoroughly tested and certified under the maximum weight loads.
FM4DDE 4HP Electric Chipper
Last Updated on April 7, 2020 by Forest Master
Please Adhere to the following checklist:
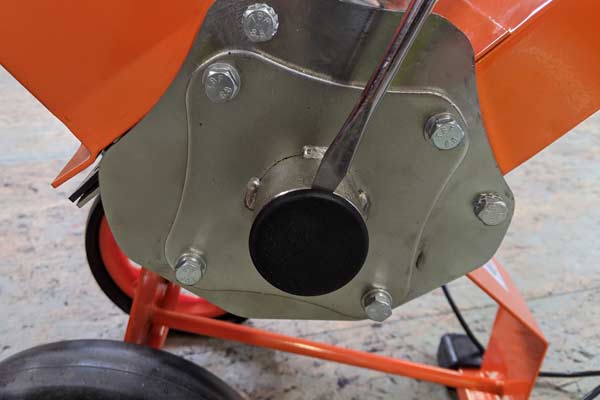
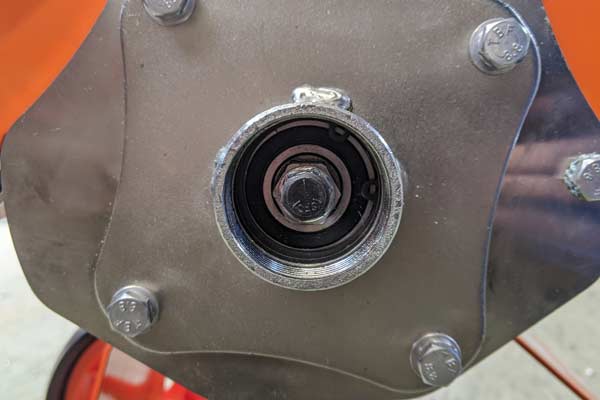
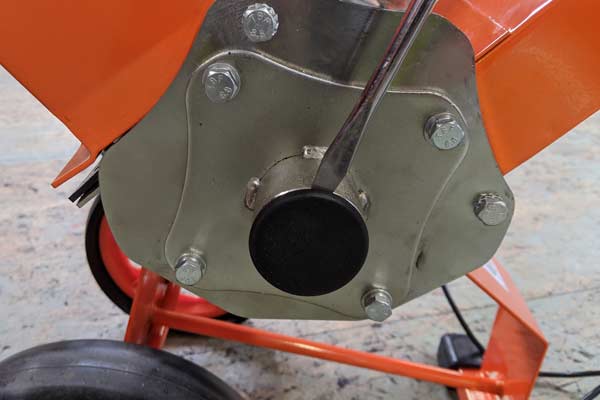
– Remove the black plastic cover from the motor and rotate the big outer nut on the end of the shaft using finger and thumb. Check that the drum is rotating freely in both directions and ensure that they aren’t any blockages.
– If the drum is not moving freely using finger and thumb, remove the hopper and clear any blockages from the drum, spinning it back and forth using the nut on the motor to ensure the whole drum is clean of any possible blockage.
– Re-position the hopper back in to place and tightly secure the bolt (this is important as the bolt acts as a safety mechanism for the chipper). Ensure that the correct bolt is used when reassembling.
– Check the fuses on the device and the mains power supply, including any extension cables.
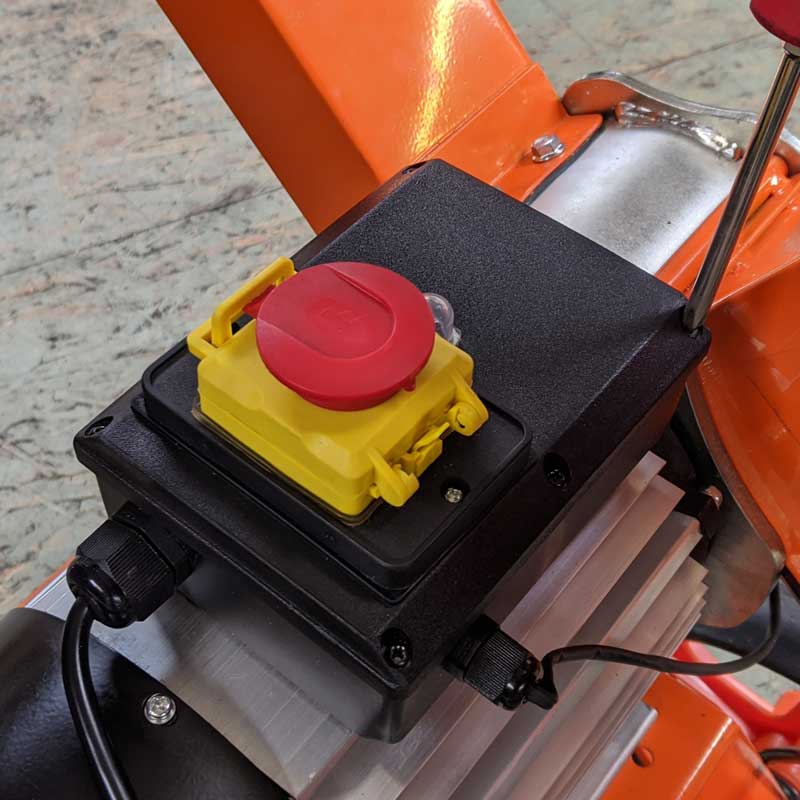
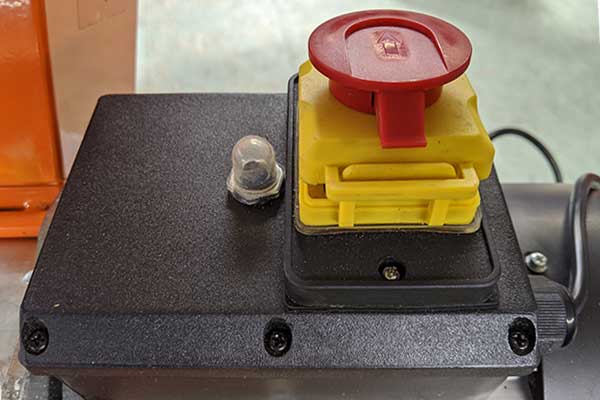
– Reset the trip switch which is located beside the ON/OFF switch on top of the motor. (small clear button). If the trip switch is tripped, this is either due to an overload or the drum may have a blockage.
Last Updated on July 21, 2020 by Forest Master
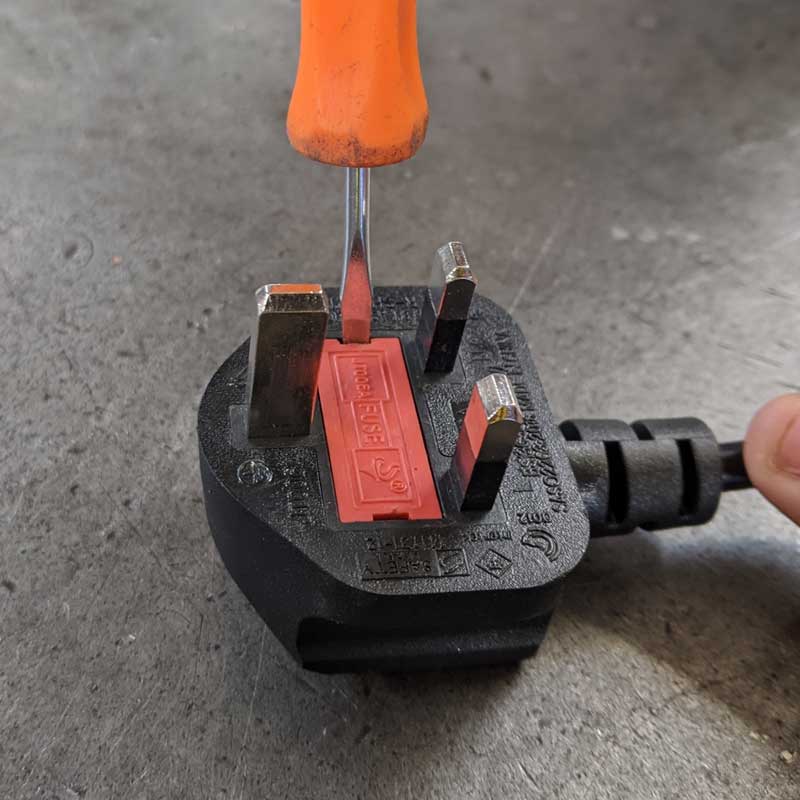
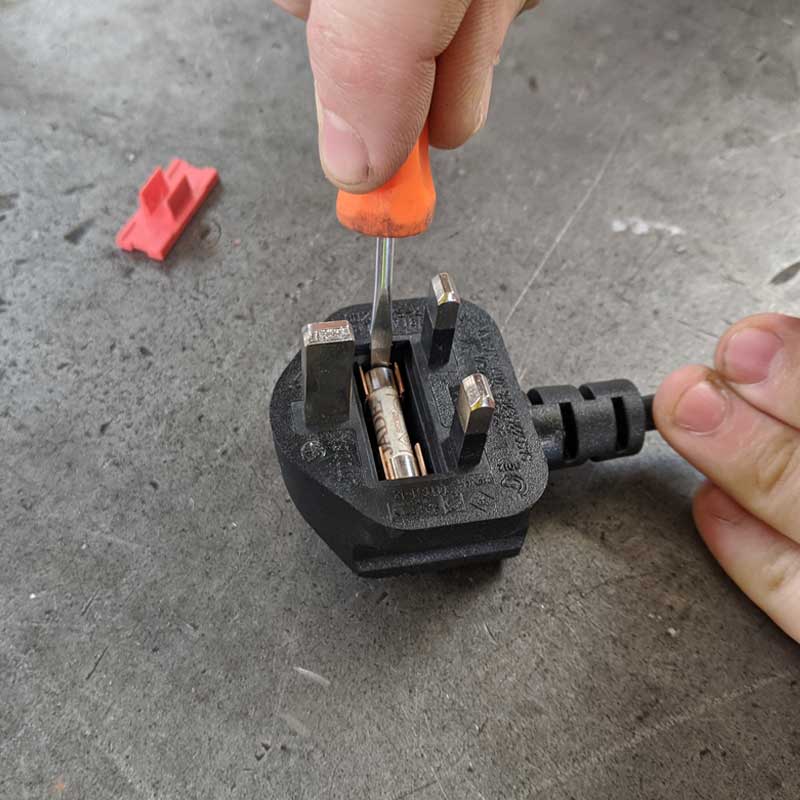
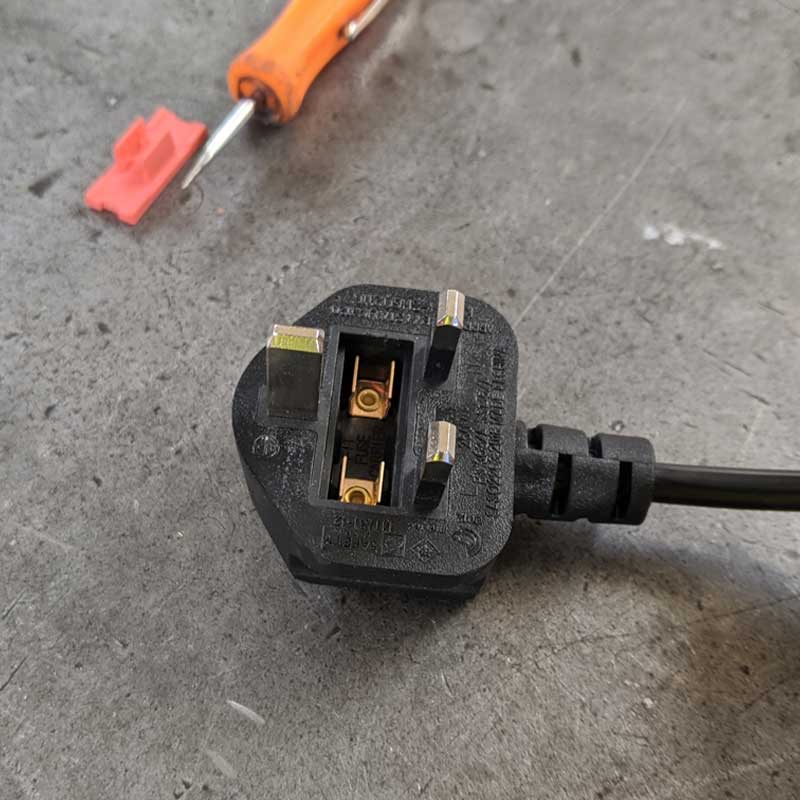
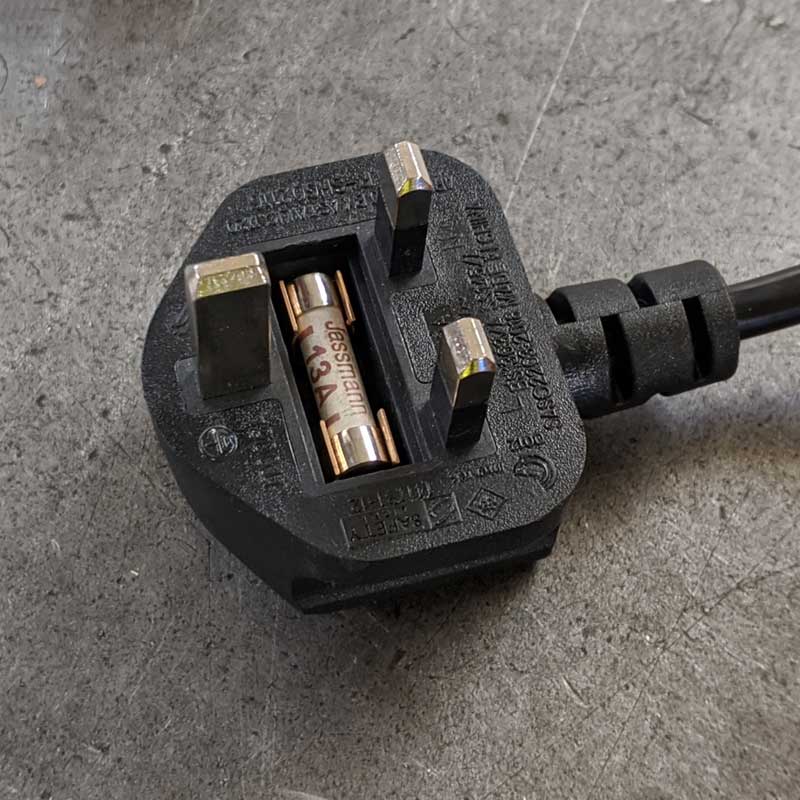
Replacing a plug socket fuse is a straight forward process.
– Before beginning, remove the plug from the wall and you will be able to see the cover between the terminals.
– Find a suitable screw driver and carefully remove the cover from the base of the plug.
– Remove the old fuse from the plug using a small screwdriver.
– Simply slide in the new fuse into where the old fuse previously sat and then reassemble the plug, attaching the cover back into place.
Last Updated on April 15, 2020 by Forest Master
The FM4DDE is designed for wood material such as branches, hedge trimmings, conifers and other dry materials. It utilises a drum to chip and shred the materials so caution is advised if you’re planning on using the FM4DDE for materials such as wet items such as ivy, as it may wrap around the drum and jam it.
Last Updated on April 14, 2020 by Forest Master
If you click the start button on the chipper and you don’t feel or hear a click of the button, then this typically means that the chipper isn’t receiving power.
Check the fuses on the device and the mains power supply, including any extension cables.
Ensure that the bolt on the hopper is tightly secured. This is vital as the bolt acts as a safety feature for the wood chipper so it must be tightly nipped in order for the chipper to start.
Last Updated on April 20, 2020 by Forest Master
If the motor is humming while the blades are failing to work, this typically means that the drum has a blockage of some kind.
First step is to remove the black cap from the drum, and then twist the big outer nut with your finger and thumb. You should be able to spin the drum freely with no resistance.
If there is some resistance, remove the hopper and clear any blockages from the drum. Spin the drum back and forth using the nut on the motor to ensure that the whole drum is clean of any possible blockage.
Reposition the hopper back in to place and tightly secure the bolt (this is important as the bolt acts as a safety mechanism for the chipper). Also ensure that the correct bolt is used when reassembling.
Last Updated on April 15, 2020 by Forest Master
The entrance leading direct to the cutter is 95 mm x 95 mm. The upper section has a CE plate fitted to restrict the size of cutting to 2 x 55mm holes with a slot joining the two holes which provides an entrance for side shoots and branches etc. The safety plate is not required for USA or Canada.
Last Updated on July 30, 2021 by Forest Master
Wood is too dried out
The compact chipper series is designed primarily for chipping freshly cut wood. The FM6DD has been tested thoroughly chipping freshly cut hawthorn wood (slow-grown hardwood).
We recommend that the wood is chipped no longer than three days after cutting. After this date, the wood will begin to dry out, meaning the chipper blades then struggle to dig into the wood. This produces a sawdust-like waste from the exit chute, and the chipper will struggle to self-feed.
If the chipper is producing sawdust – this is a clear sign that the wood is dry. When chipping slow-grown hardwood like fruit trees (such as cherry or apple trees) you must ensure that you chip the material the same day that it is cut to ensure the machine operates at full effectiveness.
Last Updated on August 10, 2021 by Forest Master
This largely depends on the hardness of the wood you’re chipping. The harder the wood, the quicker the blades will need to be replaced.
However, the chipper is equipped with twin reversible blades. The reversible blades mean that you can simply switch the blades around when the first set start to dull, so you get a much longer life span on the blades.
We also stock spare blades on our website, should you need to have them replaced.
You can also sharpen your blades using an oil stone. Simply sharpen the edges of the blade, do not worry about taking out any dents or marks.
Last Updated on July 6, 2020 by Forest Master
Both the FM6DD and the FM4DDE utilise a direct drive for performance, this means that there are no belts or chains that you need to adjust.
Last Updated on July 21, 2020 by Forest Master
In order to rotate the blades on any of our chippers, you much use a hex socket (6 sided) with no leading edge, this is important or you will round off the head.
Sometimes it helps to tighten a tiny bit before undoing the bolt.
When the process is complete, use a small amount of thread lock and screw back into position.
Last Updated on March 5, 2021 by Forest Master
Our compact chippers are built for the primary purpose of being a chipper and shredder. However, the chipper can still handle dry green waste such as laurel and conifer.
The cutting blades are set at a 0.5mm gap, these can be adjusted to be very close together which eliminates the gap for any leaves to bypass the cutting blades.
The FM6DD spins at a higher rate (3600 rpm v 2800 rpm) than the FM4DDE, the higher spin rate means that the chipper is able to produce smaller cuttings.
This machine is not capable of mulching wet green waste such as ivy or nettles, however, our mulching machine can easily mulch pretty much any material you throw at it. Take a further look at it by clicking here. FM6DD-MUL.
Last Updated on July 21, 2020 by Forest Master
ENSURE THAT THE CHIPPER IS COMPLETELY UNPLUGGED FROM ANY SOURCE OF POWER
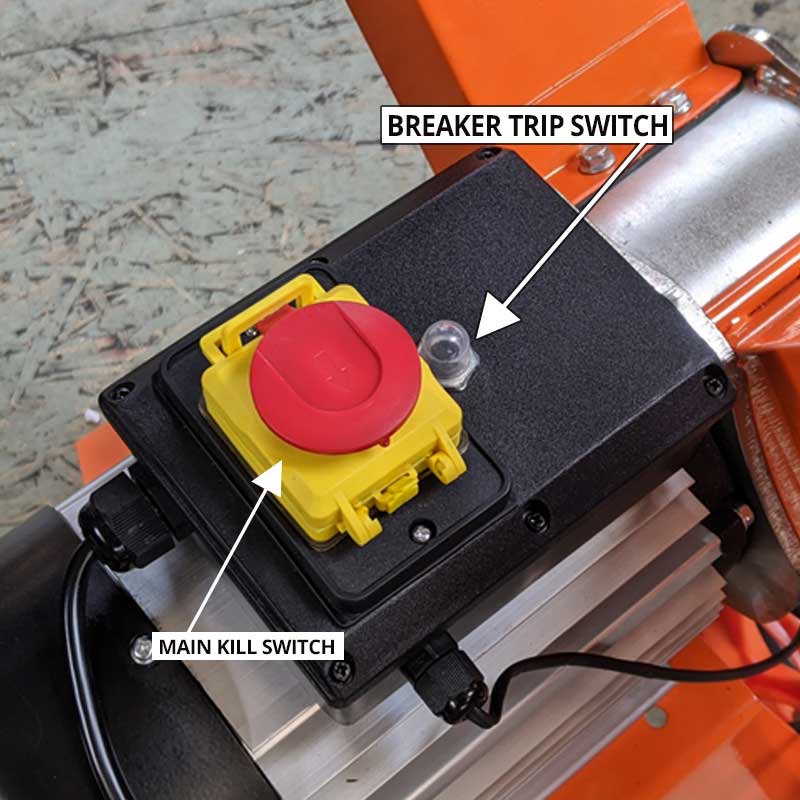
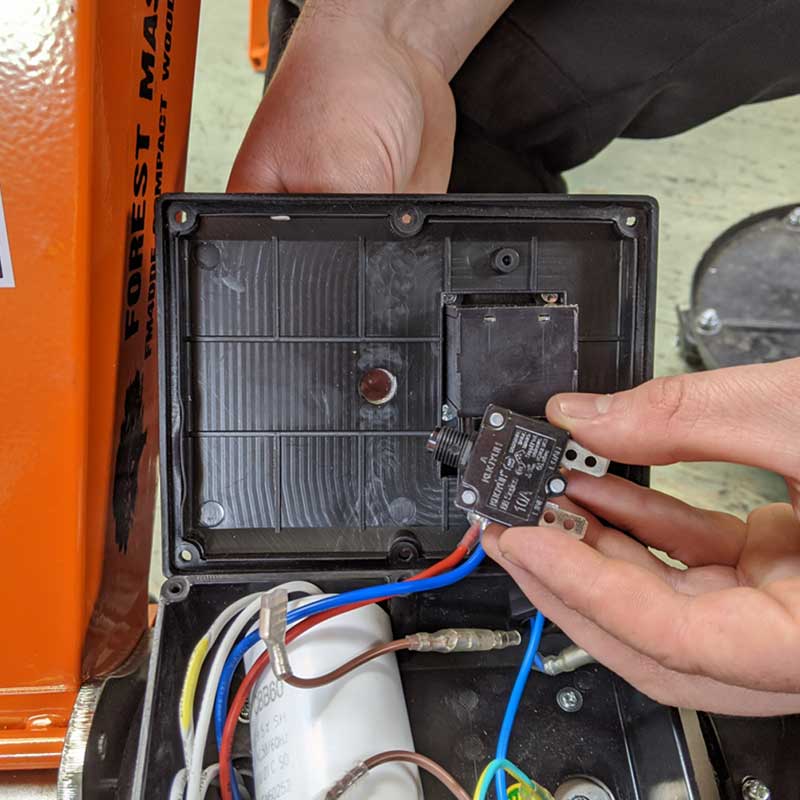
The breaker trip switch is the small plastic button which is located beside the kill switch.
If you’re using a standard UK 3-Pin Plug (13 amp), you may have encountered issues with the chipper blowing fuses. we’re providing a 10 amp trip as well as three time delay fuses in order to prevent further issues when using a standard 13 AMP UK 3-Pin Plug. The trip replacement will also allow the machine to start up a lot easier. The replacement process can be completed in just a few short minutes.
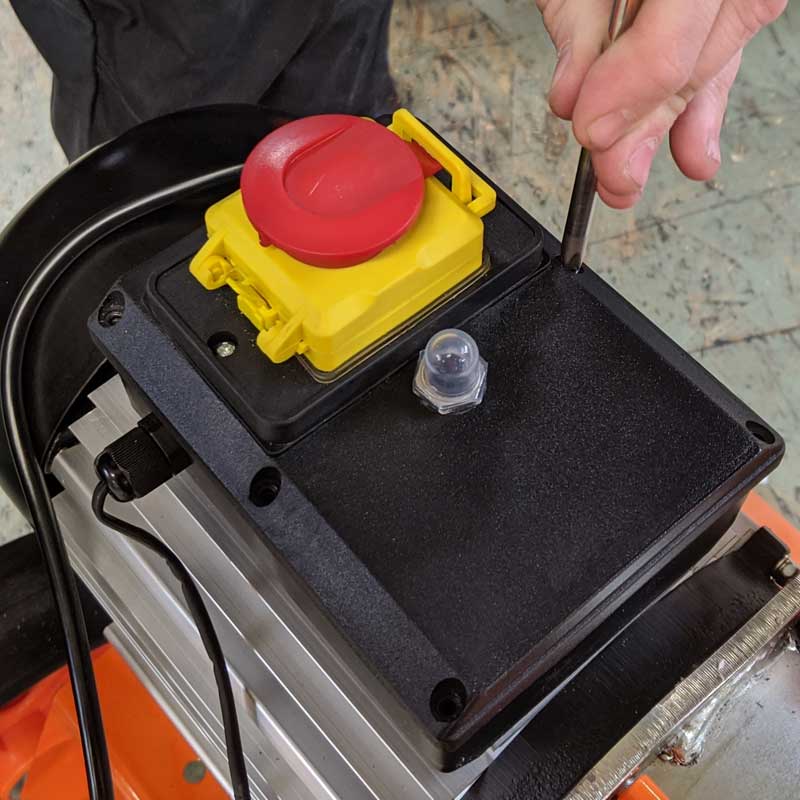
1. First, remove the 6 screws from the perimeter of the cover lid.
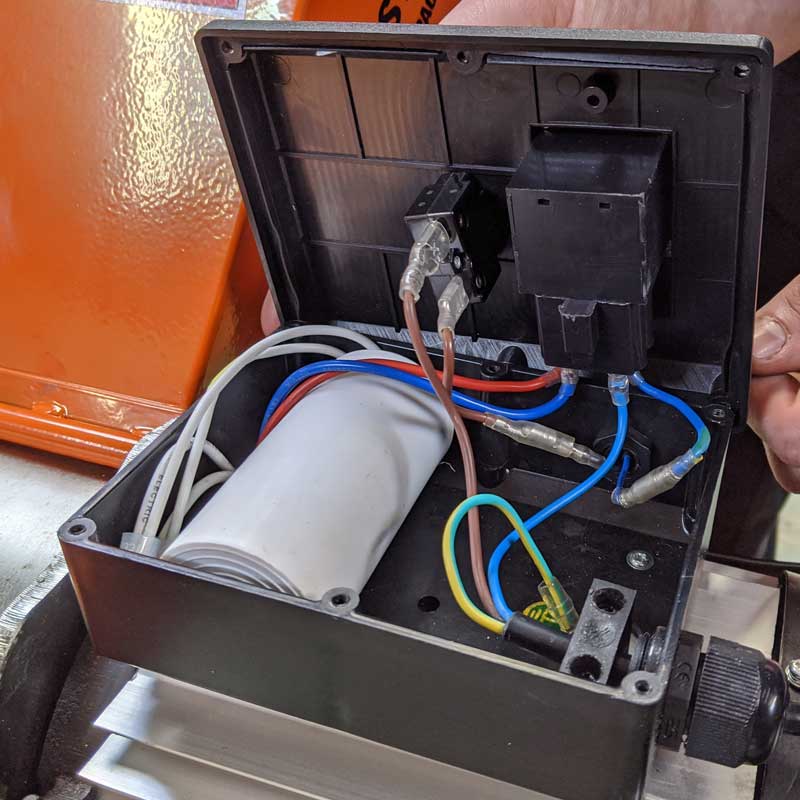
2. Open the cover lid and examine the circuit trip which is located on the inside of the lid.
3. The next step is to remove the wires from the circuit trip, take care as one of these wires may have a small tab on the inside which will need to be pressed down in order to release the wire. It’s best to remove the plastic covers from the end of the wires in order to check for the tab.
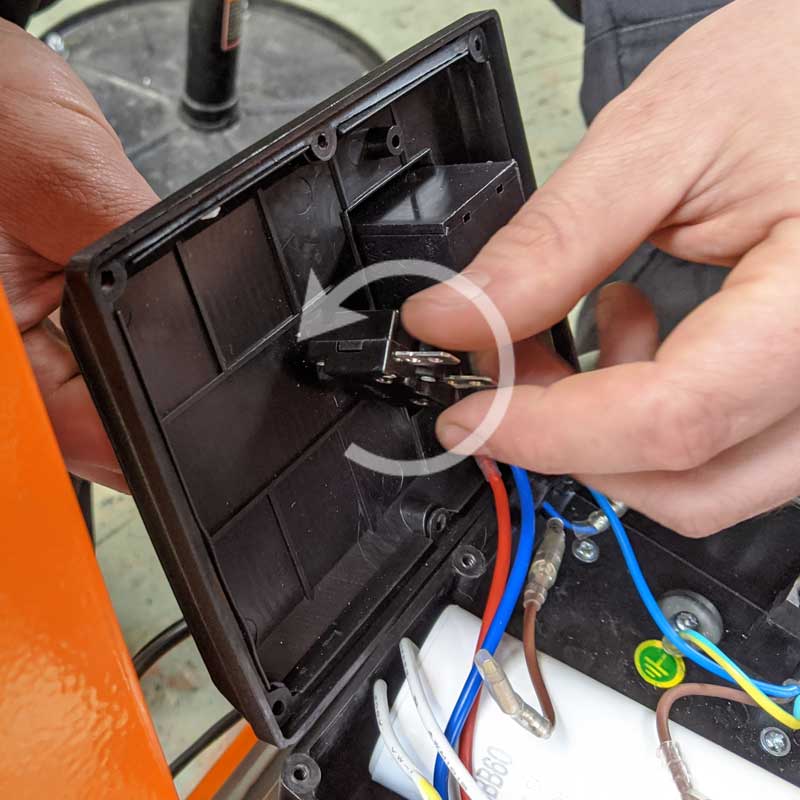
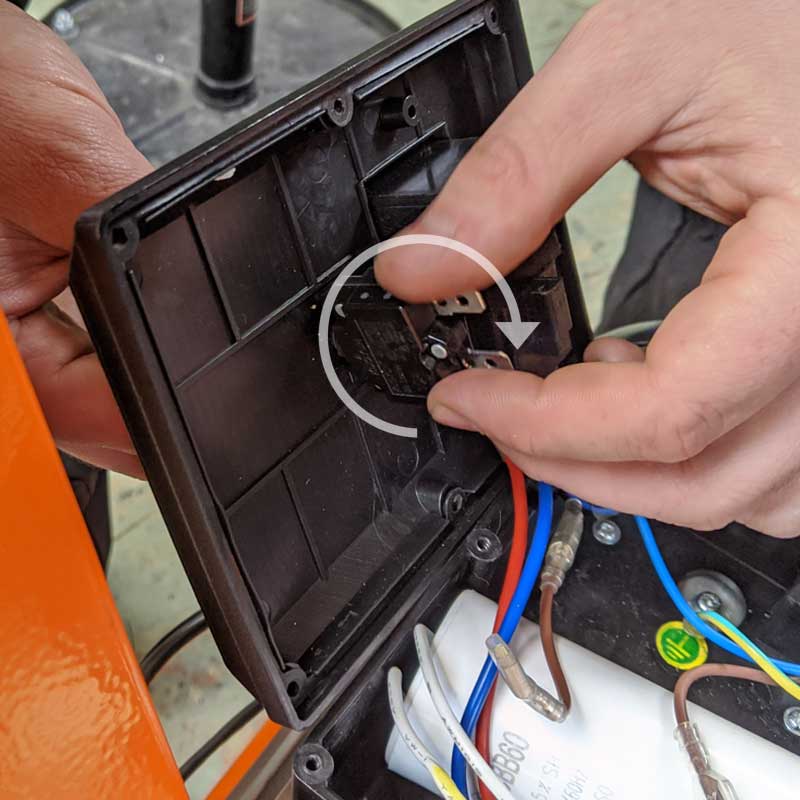
4. You can now unscrew the old circuit trip from the lid by rotating anti-clockwise. It’s best to hold onto the plastic trip on the other side of the lid in order to turn the circuit effectively.
5. When you have removed the old circuit trip, you can then install the new trip by following the same instructions but instead turning clockwise when installing.
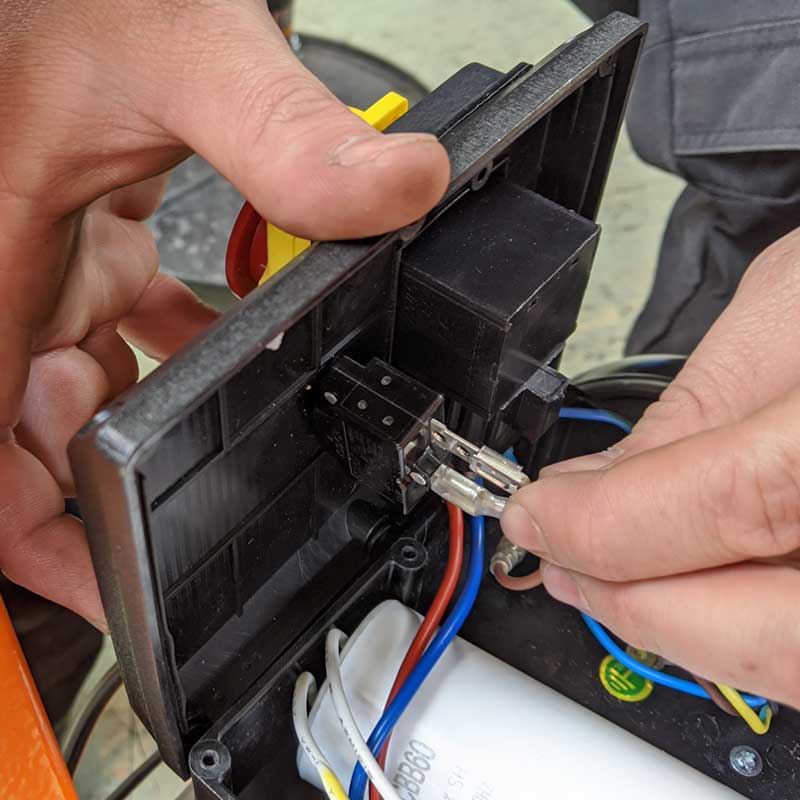
6. Now reinstall the wires into the new circuit trip. You can install these wires in any order.
7. Finally, close the lid and screw back into place.
Last Updated on October 8, 2020 by Forest Master
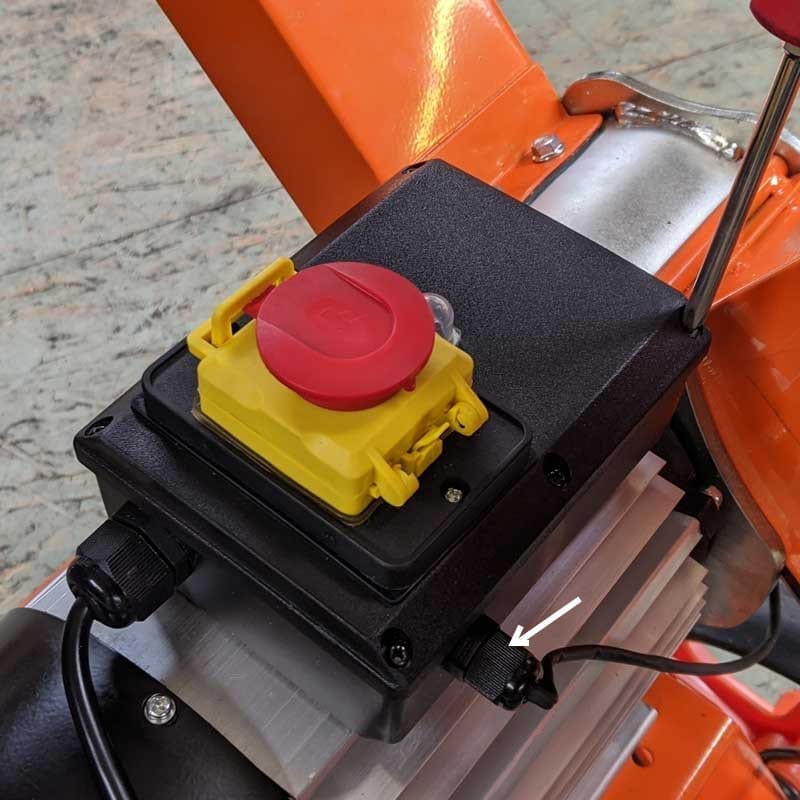
- Remove the 6 screws (circled) that hold the cover of the switch box closed.
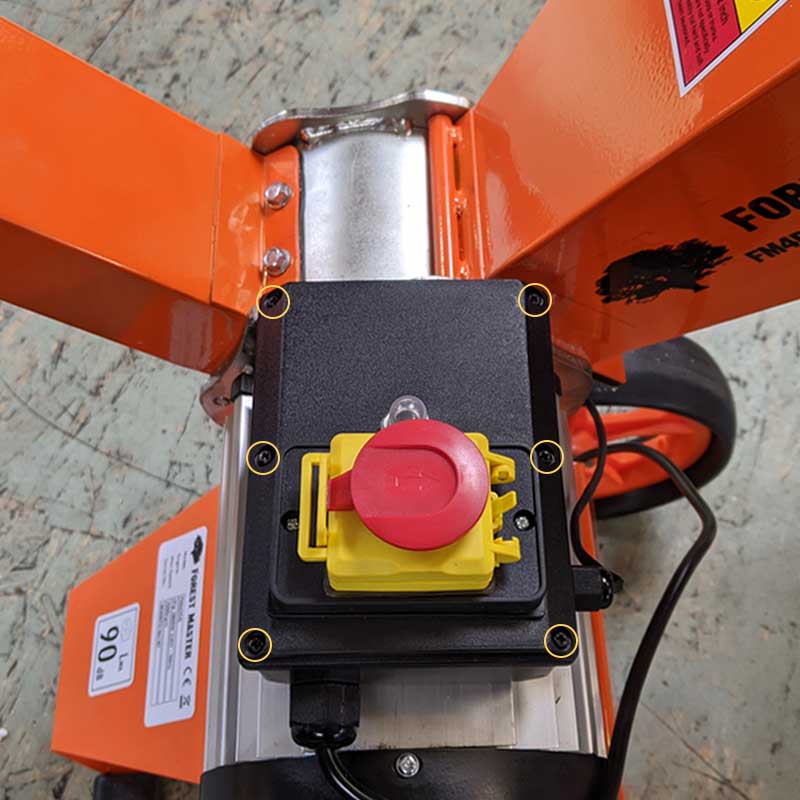
2. Disconnect the bullet connectors (arrowed) of the black and blue wires from the hopper switch.
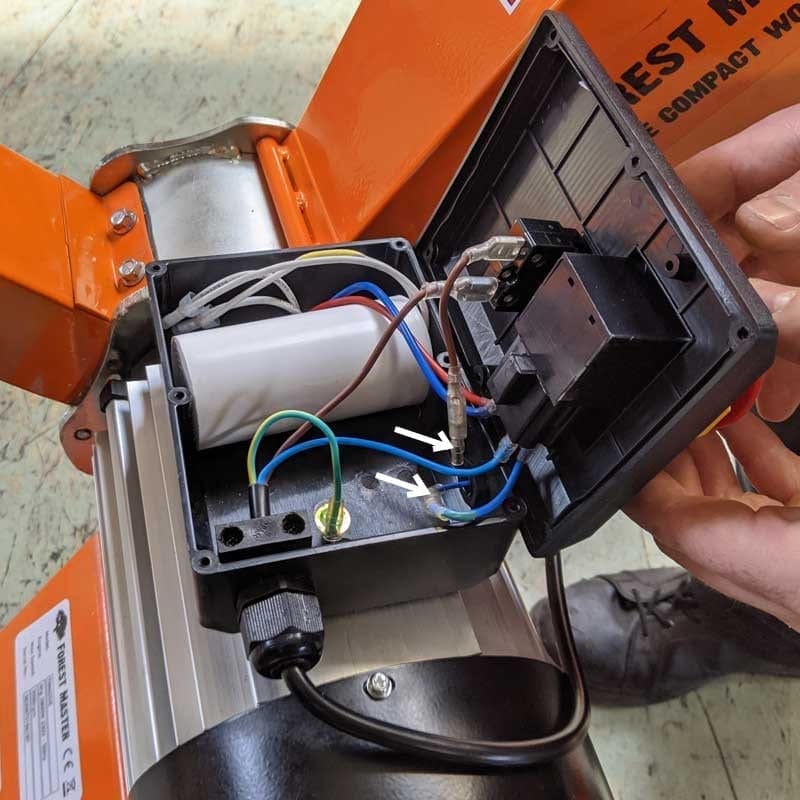
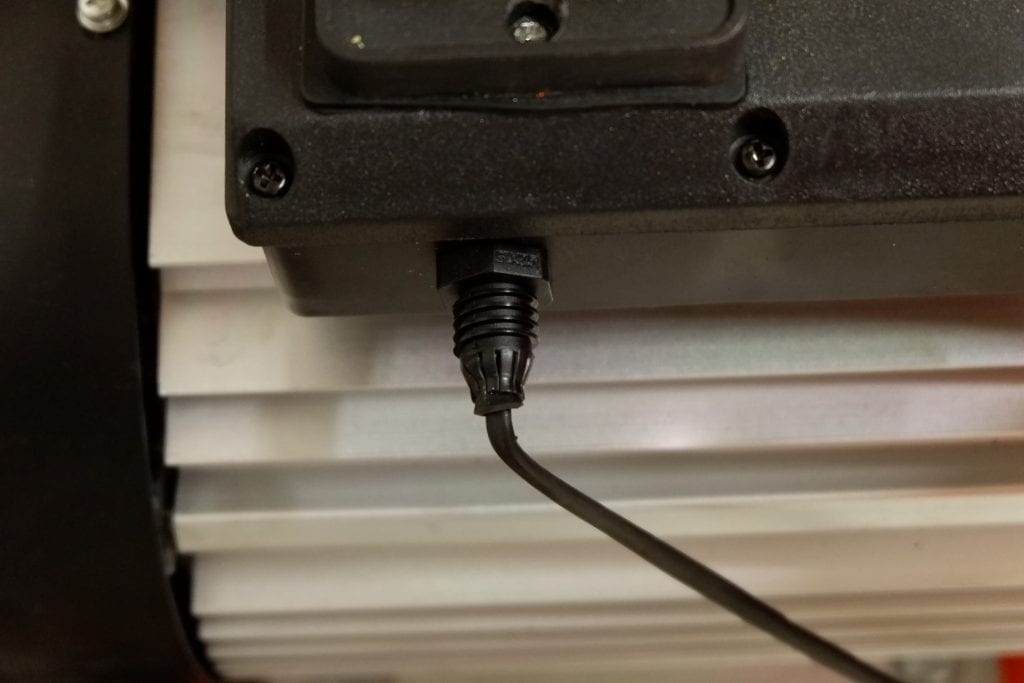
3. Unscrew the cover of the cable grommet and draw the two wires out.
4. Open the hopper and remove the two screws securing the hopper switch then remove the switch.
Fitting the new hopper switch is the reverse process.
Attach the new hopper switch.
Feed the wires through the cable grommet into the motor switch box and screw the grommet cover on.
Connect the bullet connectors. The black wire from the hopper switch goes to the brown wire. The blue wire goes to the blue wire.
Close the lid and secure the six screws.
Last Updated on October 8, 2020 by Forest Master
First, you will need to check the main supply voltage.
The extension cable you use will also have to be 2.5 cable and be used full unwound.
On average, we lose 1 volt of power for every meter of cable. So if you were to extend over 30 meters then you’re losing 30 volts of power. When a motor is designed for 230/240 volts you are overloading the motor by running it with less than 220 volts.
In the past, customers have been known to run at 200 volts with no issues but over time this can cause issues with the motor causing them to fail.
Standard household mains will typically run at around 230v/240v but it’s recommended that you check this as it’s quite possible that you’re running at a lower level.
FM6DD 6HP Petrol Wood Chipper
Last Updated on March 29, 2021 by Forest Master
– Ensure that the oil level is higher than at least 600ml. The chipper should be filled with 600ml to 650ml of oil. Any less than 600ml of oil and the machine will not start. An oil alert will prevent the engine from starting.
– If the pull-start is tight, remove the black cover from the motor and rotate the big outer nut on the end of the shaft using finger and thumb. Check that the drum is rotating freely in both directions and ensure that they aren’t any blockages.
– If the drum is not moving freely using finger and thumb, remove the hopper and clear any blockages from the drum, spinning it back and forth using the nut on the motor to ensure the whole drum is clean of any possible blockage.
– Reposition the hopper back in to place and tightly secure the bolt (this is important as the bolt acts as a safety mechanism for the chipper). Ensure that the correct bolt is used when reassembling.
Last Updated on April 15, 2020 by Forest Master
The entrance leading direct to the cutter is 95 mm x 95 mm. The upper section has a CE plate fitted to restrict the size of cutting to 2 x 55mm holes with a slot joining the two holes which provides an entrance for side shoots and branches etc. The safety plate is not required for USA or Canada.
Last Updated on July 30, 2021 by Forest Master
Wood is too dried out
The compact chipper series is designed primarily for chipping freshly cut wood. The FM6DD has been tested thoroughly chipping freshly cut hawthorn wood (slow-grown hardwood).
We recommend that the wood is chipped no longer than three days after cutting. After this date, the wood will begin to dry out, meaning the chipper blades then struggle to dig into the wood. This produces a sawdust-like waste from the exit chute, and the chipper will struggle to self-feed.
If the chipper is producing sawdust – this is a clear sign that the wood is dry. When chipping slow-grown hardwood like fruit trees (such as cherry or apple trees) you must ensure that you chip the material the same day that it is cut to ensure the machine operates at full effectiveness.
Last Updated on August 10, 2021 by Forest Master
This largely depends on the hardness of the wood you’re chipping. The harder the wood, the quicker the blades will need to be replaced.
However, the chipper is equipped with twin reversible blades. The reversible blades mean that you can simply switch the blades around when the first set start to dull, so you get a much longer life span on the blades.
We also stock spare blades on our website, should you need to have them replaced.
You can also sharpen your blades using an oil stone. Simply sharpen the edges of the blade, do not worry about taking out any dents or marks.
Last Updated on July 6, 2020 by Forest Master
Both the FM6DD and the FM4DDE utilise a direct drive for performance, this means that there are no belts or chains that you need to adjust.
Last Updated on July 21, 2020 by Forest Master
In order to rotate the blades on any of our chippers, you much use a hex socket (6 sided) with no leading edge, this is important or you will round off the head.
Sometimes it helps to tighten a tiny bit before undoing the bolt.
When the process is complete, use a small amount of thread lock and screw back into position.
Last Updated on March 5, 2021 by Forest Master
Our compact chippers are built for the primary purpose of being a chipper and shredder. However, the chipper can still handle dry green waste such as laurel and conifer.
The cutting blades are set at a 0.5mm gap, these can be adjusted to be very close together which eliminates the gap for any leaves to bypass the cutting blades.
The FM6DD spins at a higher rate (3600 rpm v 2800 rpm) than the FM4DDE, the higher spin rate means that the chipper is able to produce smaller cuttings.
This machine is not capable of mulching wet green waste such as ivy or nettles, however, our mulching machine can easily mulch pretty much any material you throw at it. Take a further look at it by clicking here. FM6DD-MUL.
Last Updated on March 29, 2021 by Forest Master
The FM6DD requires at least 600ml of standard engine oil. When first starting the chipper, the oil should be flowing out of the lip of the filler. The chipper should be filled with 600ml to 650ml of oil. Any less than 600ml of oil and the machine will not start.
Last Updated on April 14, 2020 by Forest Master
We recommend that you maintain the oil of the chipper so that it is flowing out of the plastic dipstick hole, or 10mm above the top mark on the steel dipstick.
Last Updated on April 14, 2020 by Forest Master
If the pull cord is tight at all, do not keep pulling or you risk damaging the pull cord.
Remove the black cover cap from the motor and rotate the big outer nut on the end of the shaft using your finger and thumb. Check that the drum is rotating freely in both directions and ensure that they aren’t any blockages.
If the drum is not moving freely using your finger and thumb, then remove the hopper and clear any blockages from the drum, spinning it back and forth using the nut on the motor to ensure that the entire drum is clean of any possible blockage.
Position the hopper back into place and tightly secure the bolt. This is a crucial step as the bolt acts as a safety mechanism for the chipper . Also ensure that the correct bolt is used when reassembling.
Last Updated on July 6, 2020 by Forest Master
The FM6DD Petrol Wood Chipper is capable of chipping any fresh wood. We’ve thoroughly tested the chipper with hawthorn and beech wood, both when fresh and seasoned.
It’s capable of chipping the wood when fresh, but after three or so days the wood will begin to season, and this causes issues with chipping.
If you’re planning on chipping seasoned hard wood, then you will require a power fed chipper.
Last Updated on August 17, 2020 by Forest Master
A rare case of the engine sputtering and cutting out may be due to the way in which the petrol was filled into the tank. When filling up the chipper with petrol, ensure that the funnel is completely dry and that no water is entering into the tank.
If this happens, the water sinks directly to the bottom of the tank and the engine then attempts to burn this first, resulting in the engine spluttering and cutting out.
Last Updated on November 2, 2020 by Forest Master
Assembly Parts:
Battery Tray – 1
M5x125 Bolt – 2
M5 Nut – 2
Battery – 1
Ignition Key – 2
If you’re reading the original FM6DD Manual; on step 5 of page 9 of the assembly instructions, attach the battery tray to the underside of the base (42) using the 4 bolts that secure the engine to the base.

Connect the battery wires to the terminals on the battery (red to positive (+)). Place the battery on the tray and secure using two M5 x 125 bolts and nuts.
Starting the chipper
- Position your wood chipper on flat, dry ground and make sure the machine cannot be moved.
- Before starting, manually turn the drum to make sure it is not obstructed and moves smoothly.
- Make sure the fuel shut-off valve is in the “ON” position.
- Move the choke control level to the “CHOKE” position (should only be needed if the engine is warm or not starting)
- Move the throttle control lever towards the “FAST” position. Turn the ignition key to the “START” position. As soon as the engine starts, allow the key to turn back to the “RUN” position.
- Move the choke control lever (if used for cold engine) slowly back to the “RUN” position when the engine is running well.
- If the Wood Chipper has not been running (cold engine), warm up the engine by running the engine at half throttle for 3 to 4 minutes, then advance the engine throttle control to the maximum speed.
Stopping the chipper
- Move the throttle lever to “IDLE”.
- Turn the Ignition key to the “OFF” position.

Last Updated on November 6, 2024 by Forest Master
All LCT petrol engines used on Forest Master products are compatible with E10 fuel. However as chippers and mulchers tend to be used infrequently, we strongly recommend that you add a fuel stabiliser to E10 or use a fuel that has been blended for use in garden equipment.
If unstabilised E10 fuel is left in the engine for a period without the engine being used then it evaporates and leaves a powdery residue in the fuel lines and carburettor. When you next use the engine, the powdery residue can get into the carburettor jet causing fuel starvation problems and requiring the carburettor to be fully cleaned.
If you do not use a fuel stabiliser or a specially blended fuel then before storing the machine for more than a few weeks, you need to drain it of all fuel and clean and dry the float bowl so there is no fuel left in it.
General Product Queries
Last Updated on April 17, 2020 by Forest Master
We can perform a service or repair on log splitters, from most manufacturers. Please contact us first as we can then book in your log splitter. If you live locally, please bring your log splitter along, we can book in the log splitter at our office.
Please note, the repair and servicing of log splitters is not free, the price will be discussed when you contact us.
Last Updated on April 17, 2020 by Forest Master
We recommend changing the oil after 150 hours of use. If you wish to learn how to change the oil, please visit our Downloads page. You can then download the latest manual for you log splitter.
Last Updated on April 17, 2020 by Forest Master
This question is not so simple to answer, as it depends on several aspects, for e.g. the side of the logs, hardness, etc. Please view the Forest Master Comparison Sheet to find the best log splitter for you.
Last Updated on April 17, 2020 by Forest Master
We stock all the spares that you will need. If you know which parts you need, please give us a call and we will happily take your order over the phone.
If you aren’t sure, check our download page and you will find all the latest manuals for each product. Every manual contains a parts list, this will assist you in finding which parts you need to order.
Last Updated on July 21, 2020 by Forest Master
Replacing a plug socket fuse is a straight forward process.
– Before beginning, remove the plug from the wall and you will be able to see the cover between the terminals.
– Find a suitable screw driver and carefully remove the cover from the base of the plug.
– Remove the old fuse from the plug using a small screwdriver.
– Simply slide in the new fuse into where the old fuse previously sat and then reassemble the plug, attaching the cover back into place.
Last Updated on July 21, 2020 by Forest Master
The log splitter must be strapped or tied to wood skids, or a pallet. You MUST also close the valve of the log splitter (air bleed valve located above the ram).
Last Updated on August 5, 2020 by Forest Master
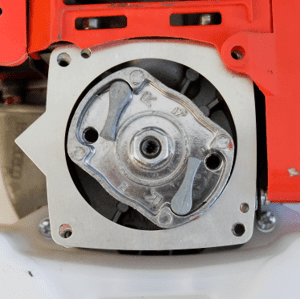
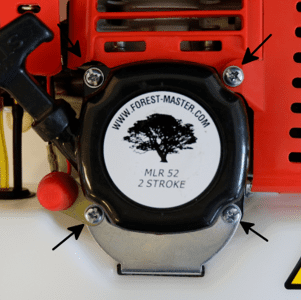
The replacement pull starts are slightly larger than the original stock pull starts on the engine and more robust. Therefore, some of the plastic shroud on the engine needs to be trimmed away.
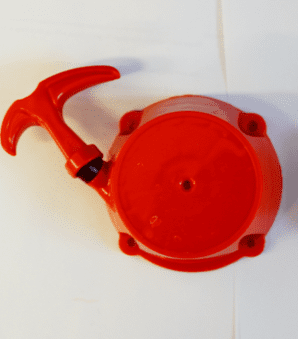
NOTE THAT DOING SO WILL NOT AFFECT YOUR WARRANTY.
The first step is to remove the four bolts securing the pull start on the side of the engine and remove the pull start. You can then remove the thin metal spacer plate which is found underneath.
You can then position the new pull start and mark a line on the plastic shroud where it has to be trimmed. Trim the shroud using a Stanley knife or sharp scissors.
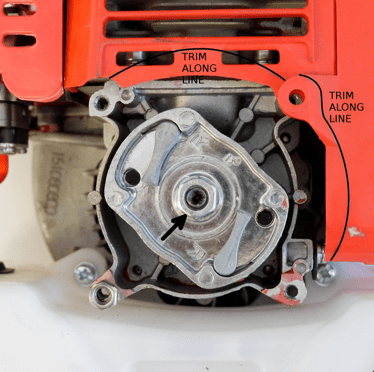
The final step is to refit the thin spacer plate and then fit in the brand new pull start. Replacing the four bolts which secure the pull start.
You can purchase a replacement pull start for your MLR52 Engine by clicking here.
Last Updated on October 8, 2020 by Forest Master
First, you will need to check the main supply voltage.
The extension cable you use will also have to be 2.5 cable and be used full unwound.
On average, we lose 1 volt of power for every meter of cable. So if you were to extend over 30 meters then you’re losing 30 volts of power. When a motor is designed for 230/240 volts you are overloading the motor by running it with less than 220 volts.
In the past, customers have been known to run at 200 volts with no issues but over time this can cause issues with the motor causing them to fail.
Standard household mains will typically run at around 230v/240v but it’s recommended that you check this as it’s quite possible that you’re running at a lower level.
Log Splitter - Small Dysfunctional Parts
Last Updated on August 27, 2020 by Forest Master
Check that the plastic knob of the lever is screwed on fully. If this becomes unscrewed it prevents the lever from being pushed right down, stopping the log splitter from operating. View the video below for a demonstration:
Last Updated on March 5, 2021 by Forest Master
It can sometimes be slightly fidgety to get the rubber plug back into the bunghole after refilling the DUO10T with hydraulic oil. We get around this by placing a little bit of washing up liquid around the plug and using a small screwdriver to ease in the inner of the bung.
Last Updated on April 9, 2020 by Forest Master
Place the log splitter on it’s back in the horizontal position. Unscrew the valve assembly and lift straight up out of the hole. Place some grease on the end of the valve stem and the threads then reinsert the valve. It should then stay closed.
Last Updated on April 9, 2020 by Forest Master
The valve (push rod) may just require cleaning.
First, ensure that the ram is fully back to it’s starting point. Then undo the nut securing the handle. Pull the valve out and then clean it using a lint free cloth. Replace it and push it back in and out a few times to make certain that it’s working. Replace the handle and then tighten the securing nut.
Last Updated on April 14, 2020 by Forest Master
Place the nut into a vice and use a big lever between the axe head and tube.
If this process doesn’t allow you to get it apart, cut the lower bar off close to the nut with a hacksaw. You can then make arrangements with us to get it back sent back to us so we can then fit new poles. You can contact us on +44 0191 276 6553.
Last Updated on August 3, 2020 by Forest Master
The black drain 8mm hex is also the dipstick on the other side of the drain bolt, it’s best to try and loosen this after the machine has been in use.
Petrol & Electric Log Splitters
Last Updated on August 27, 2020 by Forest Master
Check that the plastic knob of the lever is screwed on fully. If this becomes unscrewed it prevents the lever from being pushed right down, stopping the log splitter from operating. View the video below for a demonstration:
Last Updated on July 21, 2020 by Forest Master
The log splitter must be strapped or tied to wood skids, or a pallet. You MUST also close the valve of the log splitter (air bleed valve located above the ram).
Last Updated on July 22, 2020 by Forest Master
The splitter should be turned upside down and left for a little while before removing the pump and motor assembly, this allows the oil to drain back into the tank. You can reuse all O-rings.
Undo the 3 bolts holding the pump bracket onto the underside of the splitter (you will require a socket and extension for this)
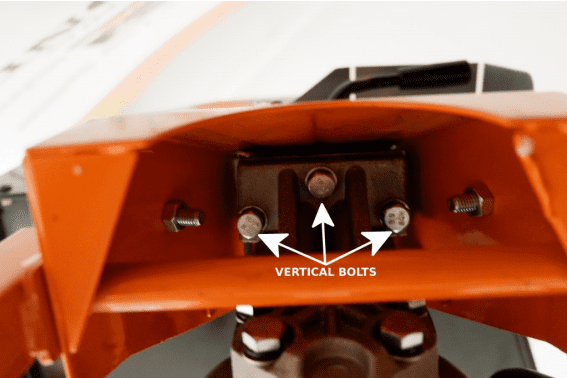
Also, remove the horizontal bolt collecting the back of the motor to the underside of the splitter body (demonstrated below)
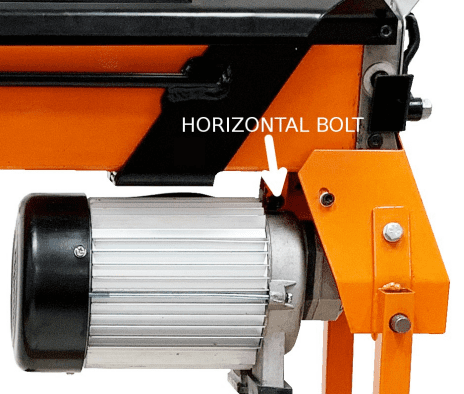
Remove the complete motor and pump bracket assembly. There are two O-rings in holes in the face of the pump bracket, ensure you do not lose these.
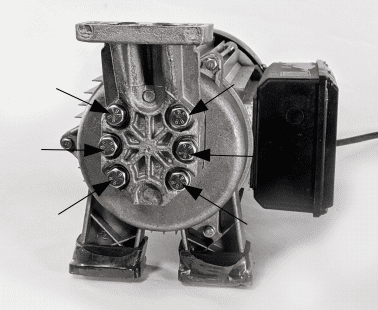
Undo the 6 bolts holding the pump bracket to the electric motor and remove the motor along with the pump plate and gears.
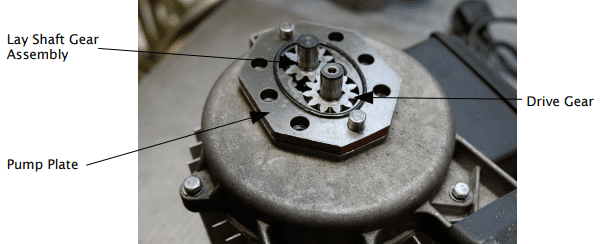
You can then remove the pump plate, lay shaft gear assembly and the drive gear from the motor shaft. Demonstrated below.
The next step is to remove the small pin (part 70) which keys the drive gear to the motor shaft. Do not misplace this as the pump will not drive without it.
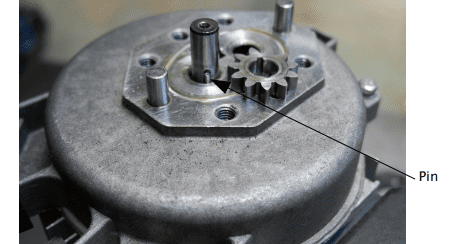
You can now undo the three long bolts holding the end cover to the motor and then remove the end cover. Note that if you have no removed the small pin (70) then you cannot draw the shaft through the cover.
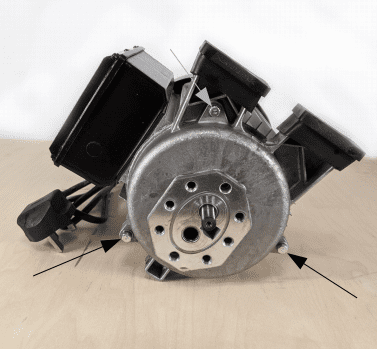
Fit the cover to the new short motor.
Insert the pin (70) into the slot in the motor shaft and fit the drive gear.
Refit the upper gear shaft, geat and the pump plate. Ensure that the two ovalO-rings are still seated in their grooves.
Attach the motor assembly to the pump bracket with the 6 bolts. Be careful not to overtighten the bolts as this will cause the pump to jam. The normal torque is 12 – 14 flbs.
Refits the pump and motor assembly to the log splitter. Ensure the two O-rings in the top of the pump are seated correctly before fitting the assembly.
If after fitting, the motor turns but the pump does not function, the likely cause is that you have not fitted the pin into the motor drive shaft and therefore the gear is not being driven.
If the motor does not turn after fitting, the 6 bolts are most likely too tight. Undo each bolt a quarter of a turn and try the motor again.
Last Updated on August 20, 2020 by Forest Master
The ram stop is used to shorten the return distance of the log splitter. If you’re cutting shorter logs you can use the ram stop to reduce the return distance, meaning you aren’t stood waiting for the log splitter to return the full distance. The ram stop is essential for reducing time spent splitting logs.
Log Splitter - Operation
Last Updated on August 27, 2020 by Forest Master
Check that the plastic knob of the lever is screwed on fully. If this becomes unscrewed it prevents the lever from being pushed right down, stopping the log splitter from operating. View the video below for a demonstration:
Last Updated on April 9, 2020 by Forest Master
Yes, the bleed-screw should be left open during operation and you can close the bleed screw when not in use. You can download the log splitter hand book by going to https://forest-master.com/downloads/
Last Updated on April 9, 2020 by Forest Master
If you are splitting a log which has already been split, you must position the wood on the splitter with the bark side down. Also, if you are splitting logs with branch stubs, place the stub pointing up if possible. Do not place logs so the stubs point down. This is to avoid damaging the log guides on the safety cage.
Last Updated on April 9, 2020 by Forest Master
Unfortunately, none of our log splitters are suitable to be towed.
Last Updated on April 9, 2020 by Forest Master
We strongly recommend wrapping the motor in a towel if it is stored unused for a long period of time and to put a breathable cover over the machine in order to prevent any condensation on the motor casing. It should not be covered in plastic sheeting or other none breathable materials.
Last Updated on August 3, 2020 by Forest Master
Yes, the bleed screw must be tightened after you have finished using it.
The air vent allows air into the machine, if you do not close off the vent it allows moisture to enter into the machine as it cools down.
Last Updated on March 3, 2021 by Forest Master
In the very rare case that the valve core shoots out of the log splitter, this is caused by misuse of the machine.
You must remember not to press down with force on the operating lever. The operating lever simply controls whether or not the ram moves – pressing harder on the lever will not increase the splitting pressure.
When the lever is pushed down with force, it bends the handle down and leads to a pressure build-up which eventually pushed the valve core out. You must also remember not to leave the log splitter under constant pressure when splitting for more than five seconds.
This can be solved – check to make sure that every part of the valve core is present, this can then be inserted back into the machine. If the valve core is damaged, you can contact us directly to purchase a new one.
You must also ensure that the operating lever is straightened to a 90 degree angle.
Log Splitter - Power Issues
Last Updated on August 27, 2020 by Forest Master
Check that the plastic knob of the lever is screwed on fully. If this becomes unscrewed it prevents the lever from being pushed right down, stopping the log splitter from operating. View the video below for a demonstration:
Last Updated on July 21, 2020 by Forest Master
First, close the bleed screw and turn the machine upside down.
You will then see 3 vertical bolts at the rear which fasted the pump bracket to the underside of the end cover, and a horizontal bolt at the top of the motor end cover.
Remove these 4 bolts and the complete assembly lifts clear.
There are two O-Rings in the top of the pump bracket, these can be reused.
You can purchase a new motor and pump assembly using this link : https://forest-master.com/product/2200w-motor-and-pump-assembly/
Last Updated on April 20, 2020 by Forest Master
Check fuse in plug. If blown replace with a working 13 amp fuse. Check RCD for the ring main has not tripped.
If the RCD has tripped, try the machine on a separate ring main. If it repeatedly trips, unplug all other equipment from sockets on the ring main and switch these sockets off. Try to start the motor.
Last Updated on April 20, 2020 by Forest Master
Check motor turns freely, remove the black fan cover. It should be possible to turn the fan with slight pressure from one finger. If not check for obstructions of the fan.
Last Updated on April 20, 2020 by Forest Master
Check that the nut securing the lever is fully tightened.
Check that the face of the lever that operates the valve is bent through a full 90 degrees in relation to the mounting face. If not, remove the lever and correct the bend in a vice.
Last Updated on April 20, 2020 by Forest Master
Loosen each of the 6 bolts on the back of the pump by ¼ of a turn and check if the motor turns freely.
Last Updated on April 20, 2020 by Forest Master
Remove the 6 bolts from the pump and separate the motor and pump. Check the gears for any silicone sealant or other material. When reasembling, the torque for the bolts is 12 ft lb, 16 N m.
Last Updated on April 14, 2020 by Forest Master
A humming noise will result in the log splitter blowing a fuse and typically means that the motor is tight.
First, turn the log splitter over and close off the air vent, remove the motor and pump 3 x 13mm headed bolts and 1 x support bolt.
Place the log splitter back upright and try the splitter again, if it produces the same noise then loosen the bolts a little from the end of the pump (13mm) and try again.
If this process does not work, then contact us on our technical line on +44 0191 276 6553.
Last Updated on August 3, 2020 by Forest Master
The capacitor in the electric motor can fail from misuse over time. When operating the log splitter, we strongly advise that you press the power button before operating the lever, this allows time for the motor to gather speed before attempting to split logs.
Pressing the lever before the button can also often result in blown fuses.
There are many different reasons why there may not be any power to your log splitter:
If you’re using an extension lead, ensure that the extension cable itself is a wider diameter than the power lead of the electric log splitter.
It’s also possible that the fuse has blown, these are easy and cheap to replace, we offer spares on our website. We also recommend testing the plug socket itself by testing another machine on the same socket.
As stated in the title, the capacitor failing will also stop the motor from starting up. After you have checked the previous solutions, unplug the log splitter from the mains. Then remove the six screws on the outside of the switch cover, take the switch cover off and you will then see the capacitor.
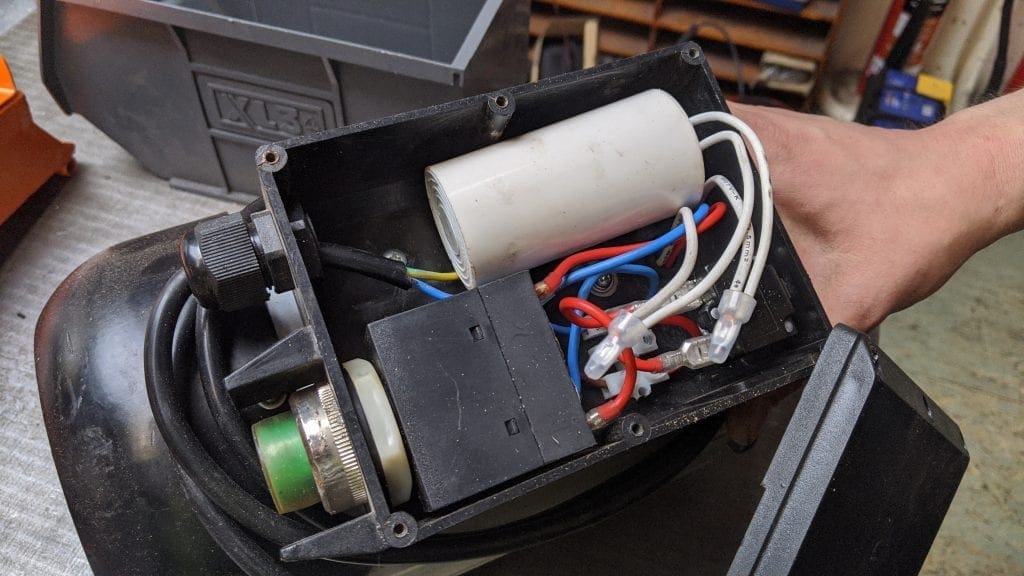
If the capacitor has failed, you will sometimes see burn marks on the capacitor itself.
Replacement capacitors are available on our website – Click here to purchase.
Last Updated on October 8, 2020 by Forest Master
First, you will need to check the main supply voltage.
The extension cable you use will also have to be 2.5 cable and be used full unwound.
On average, we lose 1 volt of power for every meter of cable. So if you were to extend over 30 meters then you’re losing 30 volts of power. When a motor is designed for 230/240 volts you are overloading the motor by running it with less than 220 volts.
In the past, customers have been known to run at 200 volts with no issues but over time this can cause issues with the motor causing them to fail.
Standard household mains will typically run at around 230v/240v but it’s recommended that you check this as it’s quite possible that you’re running at a lower level.
Last Updated on November 3, 2020 by Forest Master
In order to check if the electric motor is suffering from water damage, you need to first remove the motor and pump assembly.
Close the bleed valve of the log splitter and turn the machine upside down. There are three vertical bolts that hold the pump bracket to the underside of the end plate and a fourth horizontal bolt at the top of the rear motor cover. Remove these bolts and lift the assembly clear. There are 2 small O’Rings between the pump bracket and the end plate, make certain you do not lose these.
Next, remove the 6 bolts holding the pump bracket to the pump plate and remove the pump bracket. Check that there is no silicone sealant trapped in the pump gears. Try turning the fan again to check if the gears are turning okay.
If the gears are fine, then it’s likely the motor has suffered water damage. Withdraw the shaft locating the upper gear and the lower gear. There is a small ball bearing located on the gear of the shaft, do not lose this.
Next remove the gear from the motor shaft. There is a cylindrical key in a solot in the shaft, remove this key. You can then remove the 3 long bolts that run from end to end of the motor and remove the motor end cover.
If there is water damage, you will see white deposits inside the aluminium casing and more than likely notice a strong pungent smell. If this is the case, the motor will need to be replaced.
Log Splitter - Ram
Last Updated on August 27, 2020 by Forest Master
Check that the plastic knob of the lever is screwed on fully. If this becomes unscrewed it prevents the lever from being pushed right down, stopping the log splitter from operating. View the video below for a demonstration:
Last Updated on September 2, 2021 by Forest Master
Check underneath the blade/pusher and down the sides of the carriage, for any splinters of wood that may be obstructing the carriage.
Also, check that the plastic spacers underneath the blade and between the carriage and the underside of the splitter have not been dislodged.
Last Updated on April 20, 2020 by Forest Master
Check the log bed for a build up of sap. Apply a thin layer of grease to the bed.
Last Updated on April 20, 2020 by Forest Master
Use the Ramstop to lock the ram in position about 150mm forward. Remove the 4 bolts holding the Duoct blade/pusher to the carriage and remove the blade/pusher. Unlock the Ramstop, if the carriage returns then the arms are bent.
Check the amount of bend with a straight edge, if it is less than 5mm then you may be able to straighten them in a vice.
Last Updated on April 20, 2020 by Forest Master
If the ram does not return after removing the Duocut blade. Loosen the 2 rear lock nuts on the carriage arms and remove the 2 nuts in front of the crosspiece. Remove the carriage from the log splitter. If the ram does not return contact the dealer.
Last Updated on March 3, 2021 by Forest Master
In the very rare case that the valve core shoots out of the log splitter, this is caused by misuse of the machine.
You must remember not to press down with force on the operating lever. The operating lever simply controls whether or not the ram moves – pressing harder on the lever will not increase the splitting pressure.
When the lever is pushed down with force, it bends the handle down and leads to a pressure build-up which eventually pushed the valve core out. You must also remember not to leave the log splitter under constant pressure when splitting for more than five seconds.
This can be solved – check to make sure that every part of the valve core is present, this can then be inserted back into the machine. If the valve core is damaged, you can contact us directly to purchase a new one.
You must also ensure that the operating lever is straightened to a 90 degree angle.
Last Updated on June 17, 2021 by Forest Master
In order to prevent from overloading, the log splitter has a protective measure in place. Ensure that you do not force down the levers and keep the levers in place as you’re operating the machine.
If this has occurred; switch off the machine to reset it and then when operating again ensure that you do not force the levers down.
Log Splitter - Oil Leakage
Last Updated on April 20, 2020 by Forest Master
Loosen Bleed Screw by 3 ~ 4 rotations before operating the log splitter
Last Updated on April 20, 2020 by Forest Master
Tighten the Bleed Screw up before moving the log splitter.
Last Updated on April 20, 2020 by Forest Master
Tighten the Oil Drain Bolt with Dipstick.
Last Updated on April 20, 2020 by Forest Master
Locate the oil leak. Clean the area around the rear of the motor and log splitter with white spirit and dry it. Dab around the area with kitchen towel which should pick up spots of oil from the source of the leak. It may help to operate the pump.
After locating the leak contact the dealer.
Log Splitter - Fails to Split Logs
Last Updated on August 27, 2020 by Forest Master
Check that the plastic knob of the lever is screwed on fully. If this becomes unscrewed it prevents the lever from being pushed right down, stopping the log splitter from operating. View the video below for a demonstration:
Last Updated on April 20, 2020 by Forest Master
Refer to “Operation” section of the manual for correct log loading.
Last Updated on April 20, 2020 by Forest Master
Reduce the log sizes before splitting it on the log splitter.
Last Updated on April 20, 2020 by Forest Master
Refer to “Sharpening Wedge“ section of the manual.
Last Updated on April 20, 2020 by Forest Master
Contact the dealer.
Last Updated on April 20, 2020 by Forest Master
Turn the splitter upside down. Undo the 3 bolts fastening the pump to the underside of the rear end plate. Check the oilways in the pump and the end plate for signs of a blockage. If no sign of a blockage, contact the dealer.
Last Updated on June 18, 2020 by Forest Master
Check the nut at the base of the lever to see if it is loose.
The face of the lever should be bent at a 90-degree angle to the mounting face. If this is not the face, remove the lever and correct the bend angle, then remount.
Last Updated on April 20, 2020 by Forest Master
Remove the combined drain plug and dipstick, tip the log splitter vertically and drain the old oil.
Tip the log splitter vertically and refill with fresh oil so that it just touches the dipstick. Note that the dipstick must be fully screwed in when checking the level.
We recommend using our HYD46+ hydraulic oil which has been specially formulated.
Log Splitter - Carriage
Last Updated on August 27, 2020 by Forest Master
Check that the plastic knob of the lever is screwed on fully. If this becomes unscrewed it prevents the lever from being pushed right down, stopping the log splitter from operating. View the video below for a demonstration:
Last Updated on April 20, 2020 by Forest Master
Check that the front (fixed blade end) of the log splitter is not pointing downhill, the splitter should be level or pointing uphill.
Last Updated on April 20, 2020 by Forest Master
Check oil level or raise the front foot on a block of wood, if the splitter works normally then the oil level is low, top up. The log splitter must be vertical and the dipstick screwed in to check the level.
Last Updated on June 8, 2020 by Forest Master
Check that end of the valve stem remains in contact with the face of the lever when the lever is depressed and released. If the valve does not pop back out when the lever is realeased, clean as explained below.
ENSURE THE RAM IS FULLY RETURNED
Remove the nut holding the lever and remove the lever. Remove the valve, check the O-Ring and clean the valve with lint free cloth. Replace the valve and the lever.
Last Updated on April 20, 2020 by Forest Master
Remove the valve as above. Loosen the grub screw in the angled hole below the valve sleeve then use a wooden drift to tap in the sleeve and tighten the grub screw.
Can’t find your question? Submit it below.

