Forest Master – Frequently Asked Questions
Explore a range of frequently asked questions regarding our equipment, as well as general log splitting, gardening and forestry-related questions. Is your question not here? Submit a question by emailing us at info@forest-master.com.
6HP Petrol Mulcher (FM6DD-MUL)
Last Updated on July 30, 2021 by Forest Master
Wood is too dried out
The compact chipper series is designed primarily for chipping freshly cut wood. The FM6DD has been tested thoroughly chipping freshly cut hawthorn wood (slow-grown hardwood).
We recommend that the wood is chipped no longer than three days after cutting. After this date, the wood will begin to dry out, meaning the chipper blades then struggle to dig into the wood. This produces a sawdust-like waste from the exit chute, and the chipper will struggle to self-feed.
If the chipper is producing sawdust – this is a clear sign that the wood is dry. When chipping slow-grown hardwood like fruit trees (such as cherry or apple trees) you must ensure that you chip the material the same day that it is cut to ensure the machine operates at full effectiveness.
Last Updated on August 10, 2021 by Forest Master
This largely depends on the hardness of the wood you’re chipping. The harder the wood, the quicker the blades will need to be replaced.
However, the chipper is equipped with twin reversible blades. The reversible blades mean that you can simply switch the blades around when the first set start to dull, so you get a much longer life span on the blades.
We also stock spare blades on our website, should you need to have them replaced.
You can also sharpen your blades using an oil stone. Simply sharpen the edges of the blade, do not worry about taking out any dents or marks.
FM4DDE 4HP Electric Chipper
Last Updated on April 7, 2020 by Forest Master
Please Adhere to the following checklist:
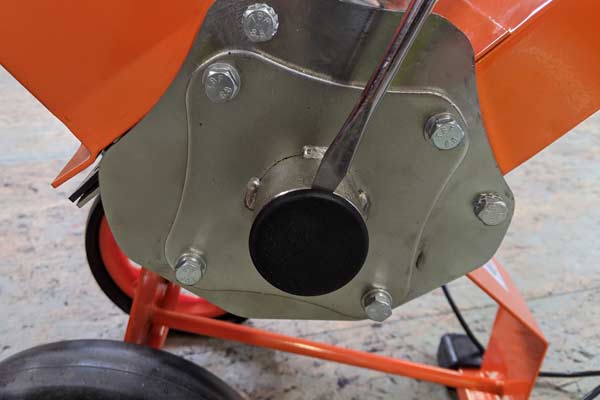
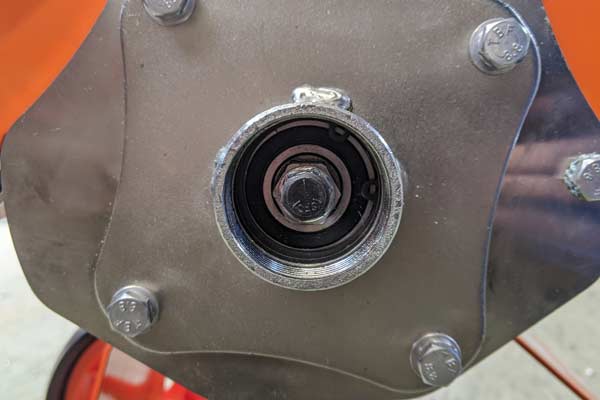
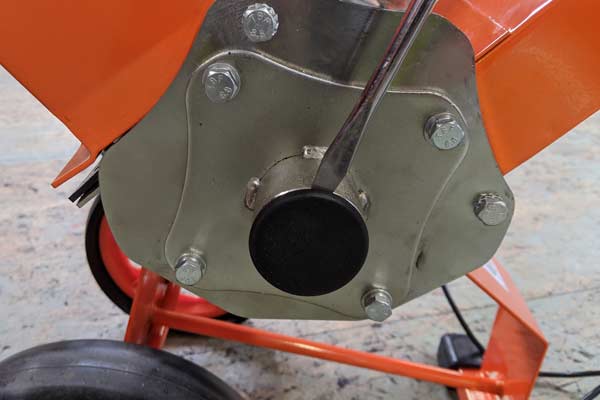
– Remove the black plastic cover from the motor and rotate the big outer nut on the end of the shaft using finger and thumb. Check that the drum is rotating freely in both directions and ensure that they aren’t any blockages.
– If the drum is not moving freely using finger and thumb, remove the hopper and clear any blockages from the drum, spinning it back and forth using the nut on the motor to ensure the whole drum is clean of any possible blockage.
– Re-position the hopper back in to place and tightly secure the bolt (this is important as the bolt acts as a safety mechanism for the chipper). Ensure that the correct bolt is used when reassembling.
– Check the fuses on the device and the mains power supply, including any extension cables.
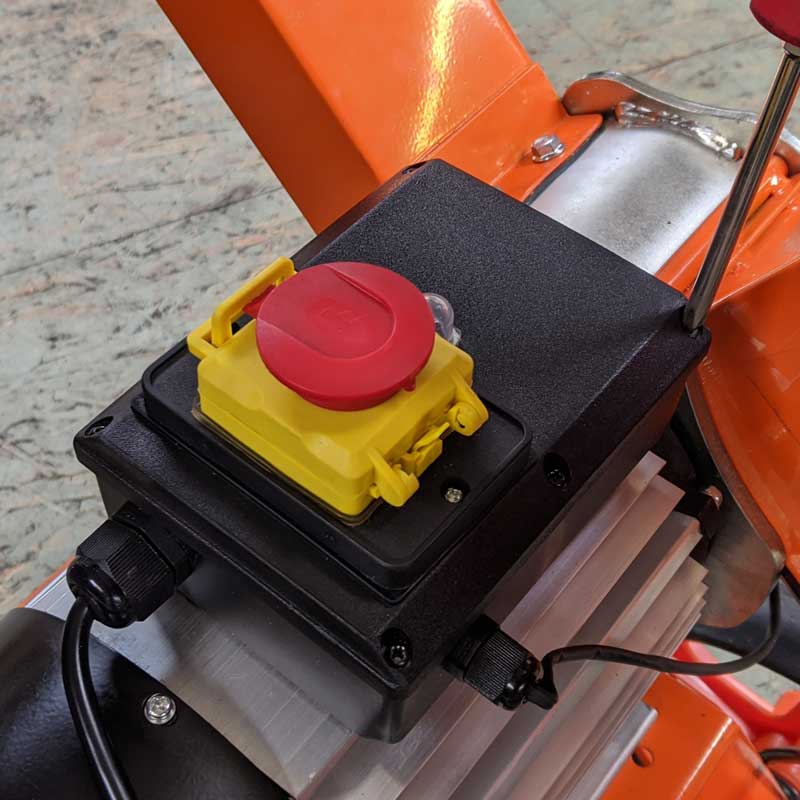
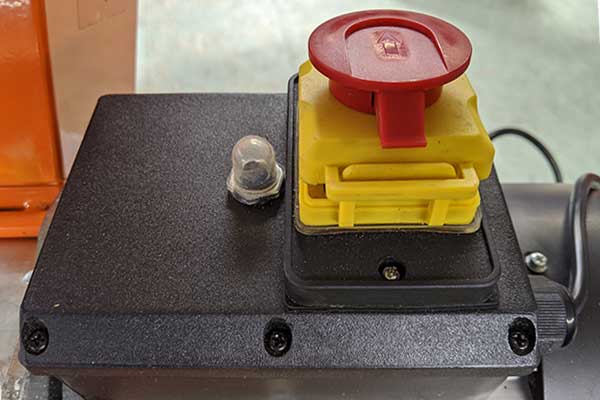
– Reset the trip switch which is located beside the ON/OFF switch on top of the motor. (small clear button). If the trip switch is tripped, this is either due to an overload or the drum may have a blockage.
Last Updated on July 21, 2020 by Forest Master
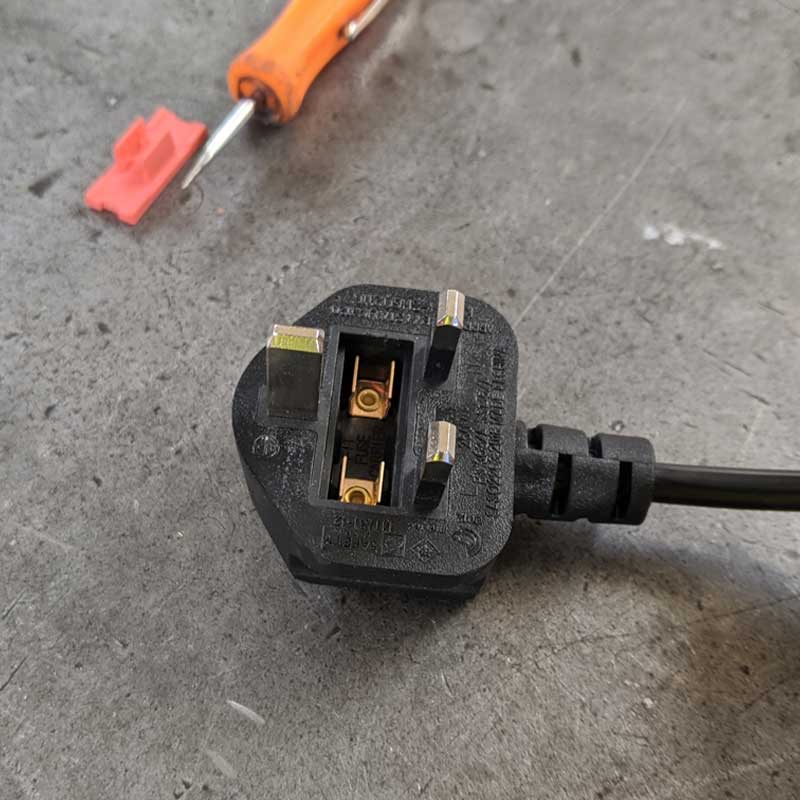
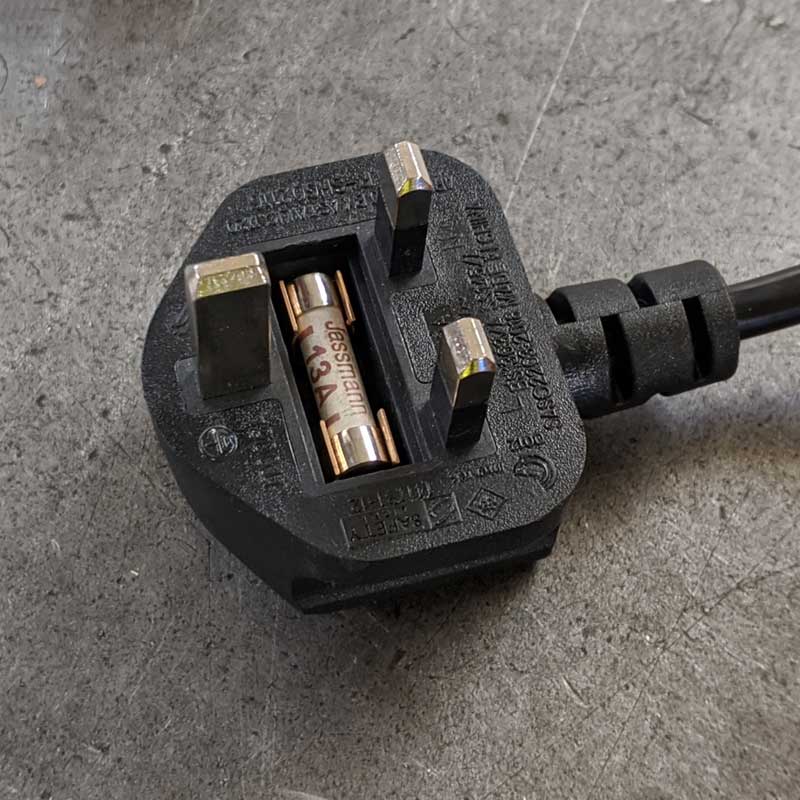
Replacing a plug socket fuse is a straight forward process.
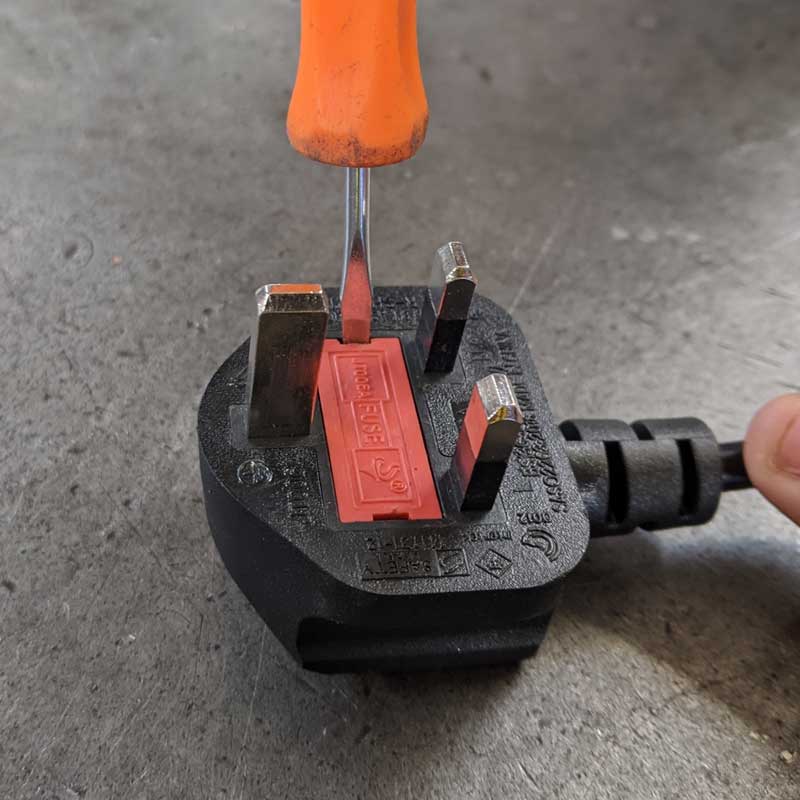
– Before beginning, remove the plug from the wall and you will be able to see the cover between the terminals.
– Find a suitable screw driver and carefully remove the cover from the base of the plug.
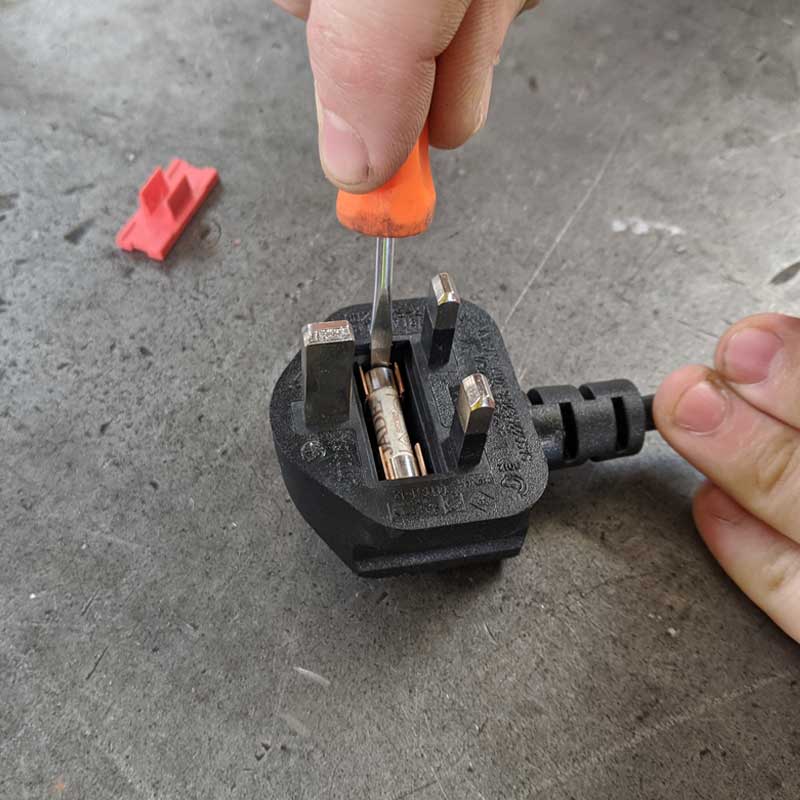
– Remove the old fuse from the plug using a small screwdriver.
– Simply slide in the new fuse into where the old fuse previously sat and then reassemble the plug, attaching the cover back into place.
Last Updated on April 15, 2020 by Forest Master
The FM4DDE is designed for wood material such as branches, hedge trimmings, conifers and other dry materials. It utilises a drum to chip and shred the materials so caution is advised if you’re planning on using the FM4DDE for materials such as wet items such as ivy, as it may wrap around the drum and jam it.
Last Updated on April 14, 2020 by Forest Master
If you click the start button on the chipper and you don’t feel or hear a click of the button, then this typically means that the chipper isn’t receiving power.
Check the fuses on the device and the mains power supply, including any extension cables.
Ensure that the bolt on the hopper is tightly secured. This is vital as the bolt acts as a safety feature for the wood chipper so it must be tightly nipped in order for the chipper to start.
Last Updated on April 20, 2020 by Forest Master
If the motor is humming while the blades are failing to work, this typically means that the drum has a blockage of some kind.
First step is to remove the black cap from the drum, and then twist the big outer nut with your finger and thumb. You should be able to spin the drum freely with no resistance.
If there is some resistance, remove the hopper and clear any blockages from the drum. Spin the drum back and forth using the nut on the motor to ensure that the whole drum is clean of any possible blockage.
Reposition the hopper back in to place and tightly secure the bolt (this is important as the bolt acts as a safety mechanism for the chipper). Also ensure that the correct bolt is used when reassembling.
Last Updated on April 15, 2020 by Forest Master
The entrance leading direct to the cutter is 95 mm x 95 mm. The upper section has a CE plate fitted to restrict the size of cutting to 2 x 55mm holes with a slot joining the two holes which provides an entrance for side shoots and branches etc. The safety plate is not required for USA or Canada.
Last Updated on July 30, 2021 by Forest Master
Wood is too dried out
The compact chipper series is designed primarily for chipping freshly cut wood. The FM6DD has been tested thoroughly chipping freshly cut hawthorn wood (slow-grown hardwood).
We recommend that the wood is chipped no longer than three days after cutting. After this date, the wood will begin to dry out, meaning the chipper blades then struggle to dig into the wood. This produces a sawdust-like waste from the exit chute, and the chipper will struggle to self-feed.
If the chipper is producing sawdust – this is a clear sign that the wood is dry. When chipping slow-grown hardwood like fruit trees (such as cherry or apple trees) you must ensure that you chip the material the same day that it is cut to ensure the machine operates at full effectiveness.
Last Updated on August 10, 2021 by Forest Master
This largely depends on the hardness of the wood you’re chipping. The harder the wood, the quicker the blades will need to be replaced.
However, the chipper is equipped with twin reversible blades. The reversible blades mean that you can simply switch the blades around when the first set start to dull, so you get a much longer life span on the blades.
We also stock spare blades on our website, should you need to have them replaced.
You can also sharpen your blades using an oil stone. Simply sharpen the edges of the blade, do not worry about taking out any dents or marks.
Last Updated on July 6, 2020 by Forest Master
Both the FM6DD and the FM4DDE utilise a direct drive for performance, this means that there are no belts or chains that you need to adjust.
Last Updated on July 21, 2020 by Forest Master
In order to rotate the blades on any of our chippers, you much use a hex socket (6 sided) with no leading edge, this is important or you will round off the head.
Sometimes it helps to tighten a tiny bit before undoing the bolt.
When the process is complete, use a small amount of thread lock and screw back into position.
Last Updated on March 5, 2021 by Forest Master
Our compact chippers are built for the primary purpose of being a chipper and shredder. However, the chipper can still handle dry green waste such as laurel and conifer.
The cutting blades are set at a 0.5mm gap, these can be adjusted to be very close together which eliminates the gap for any leaves to bypass the cutting blades.
The FM6DD spins at a higher rate (3600 rpm v 2800 rpm) than the FM4DDE, the higher spin rate means that the chipper is able to produce smaller cuttings.
This machine is not capable of mulching wet green waste such as ivy or nettles, however, our mulching machine can easily mulch pretty much any material you throw at it. Take a further look at it by clicking here. FM6DD-MUL.
Last Updated on July 21, 2020 by Forest Master
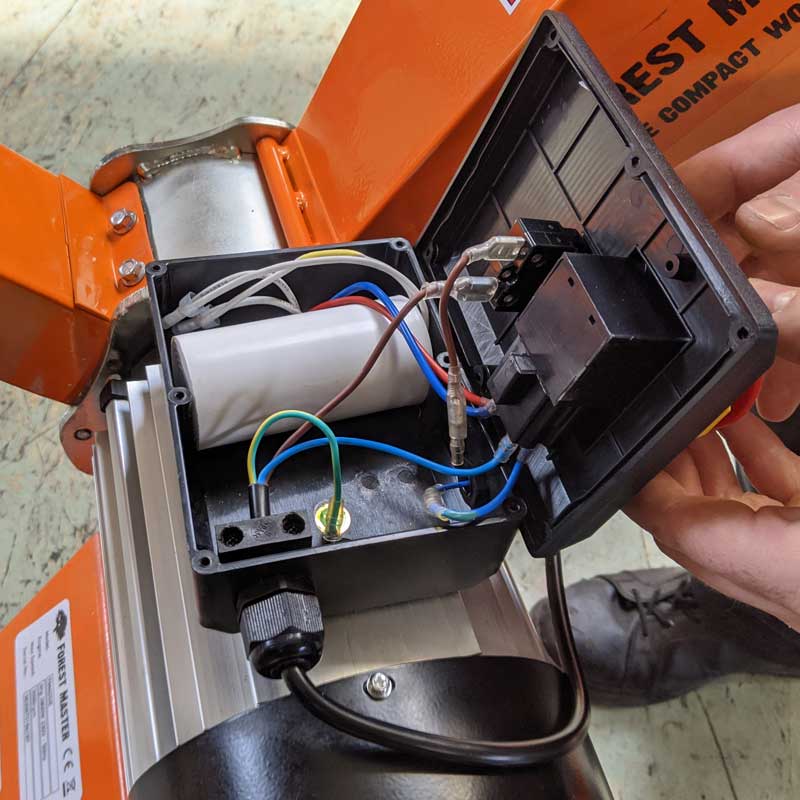
ENSURE THAT THE CHIPPER IS COMPLETELY UNPLUGGED FROM ANY SOURCE OF POWER
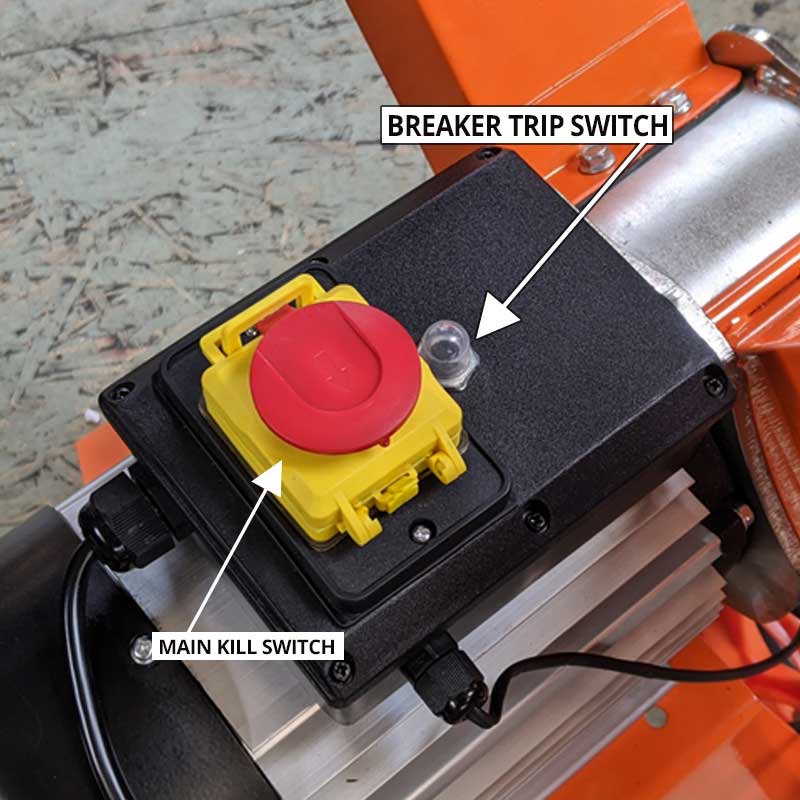
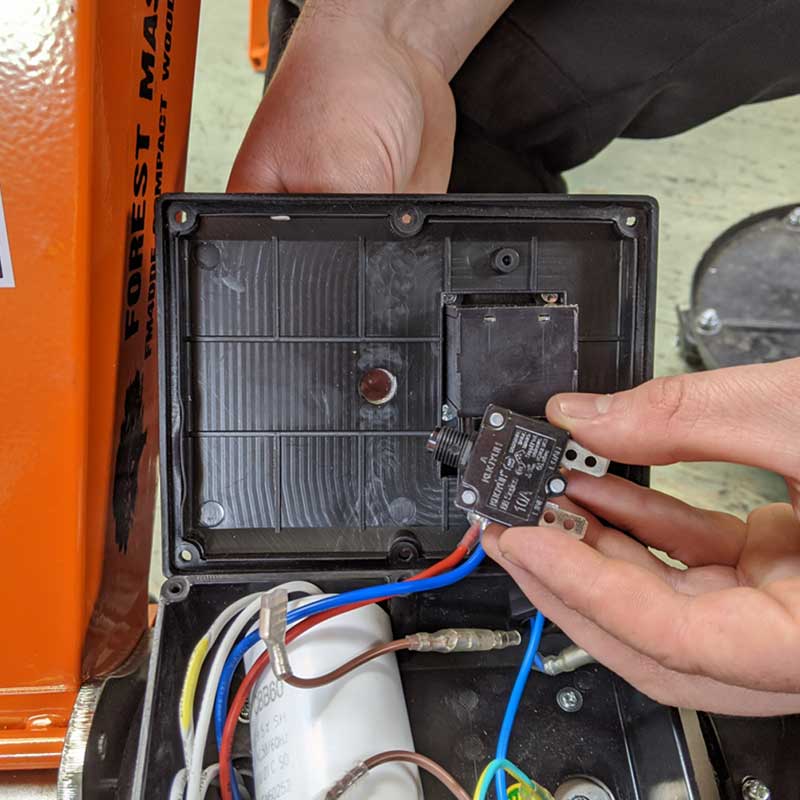
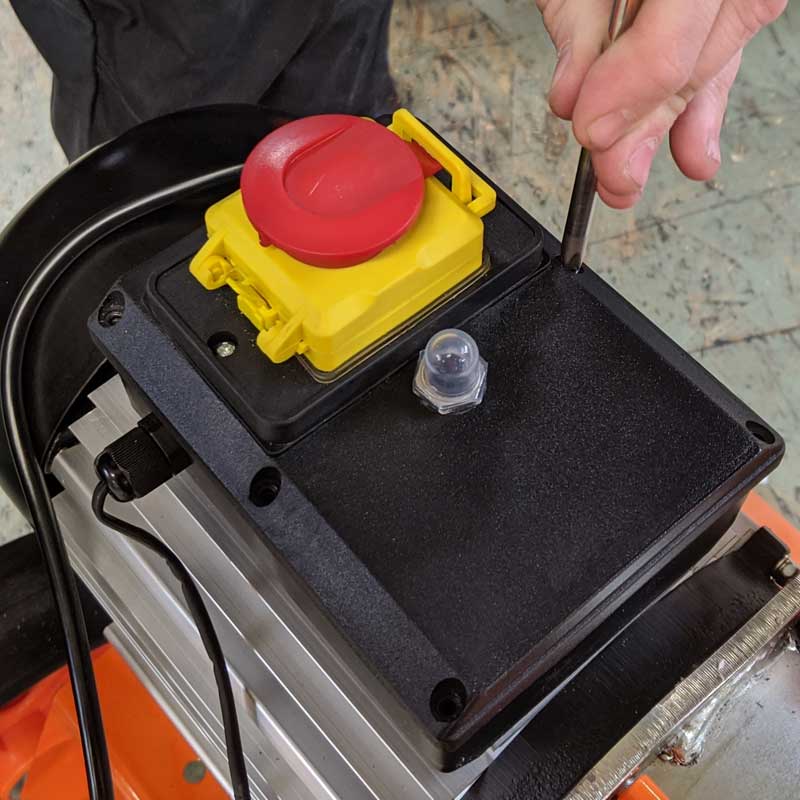
The breaker trip switch is the small plastic button which is located beside the kill switch.
If you’re using a standard UK 3-Pin Plug (13 amp), you may have encountered issues with the chipper blowing fuses. we’re providing a 10 amp trip as well as three time delay fuses in order to prevent further issues when using a standard 13 AMP UK 3-Pin Plug. The trip replacement will also allow the machine to start up a lot easier. The replacement process can be completed in just a few short minutes.
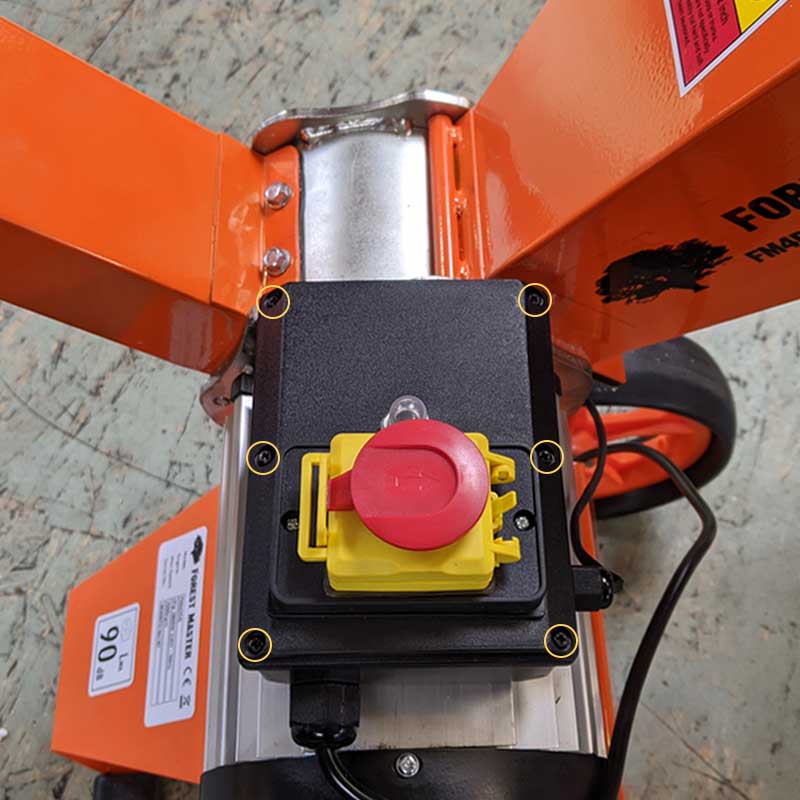
1. First, remove the 6 screws from the perimeter of the cover lid.
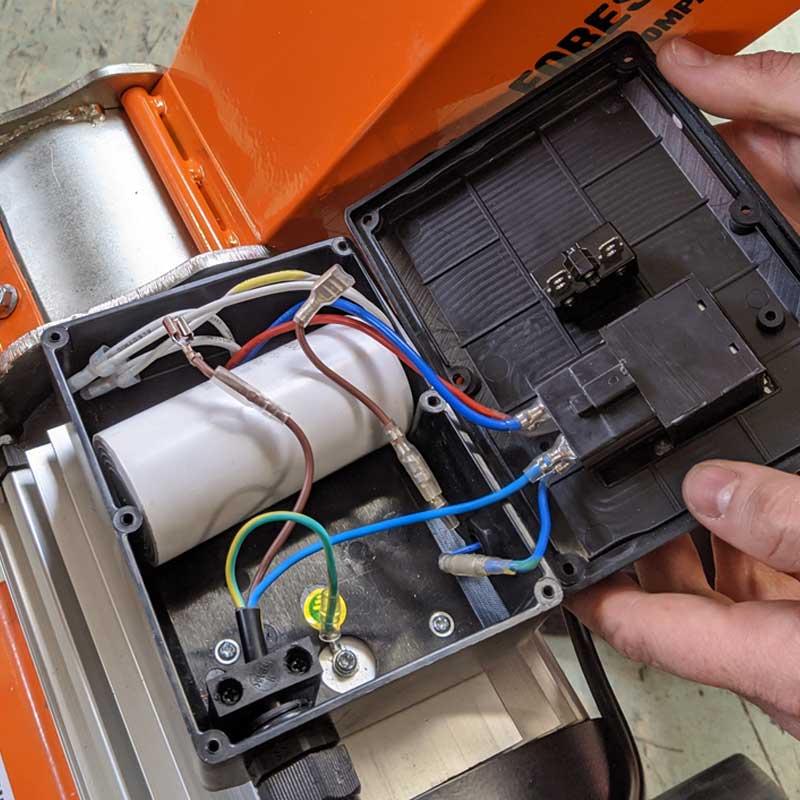
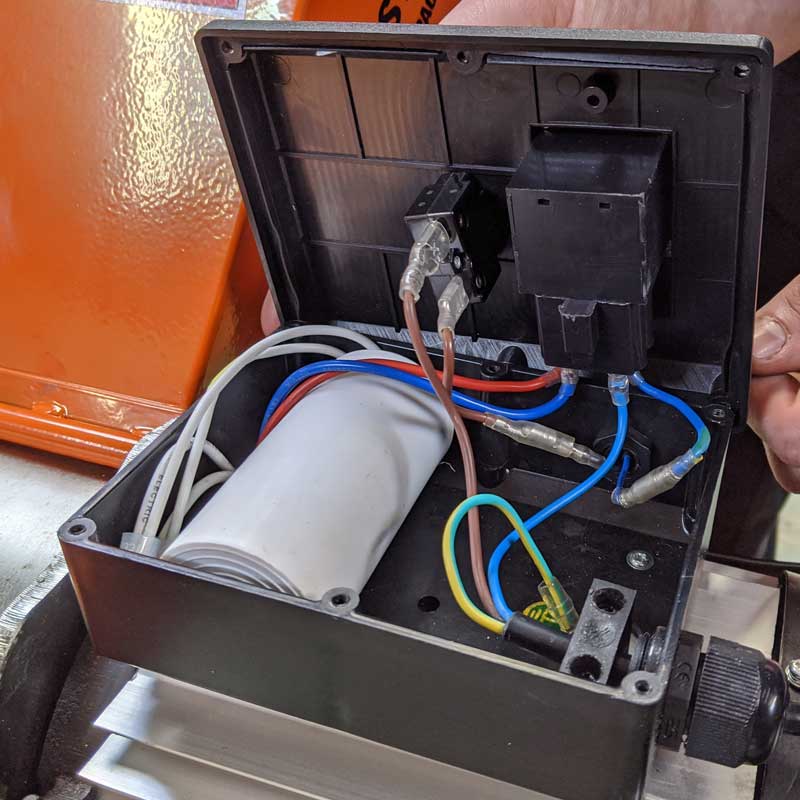
2. Open the cover lid and examine the circuit trip which is located on the inside of the lid.
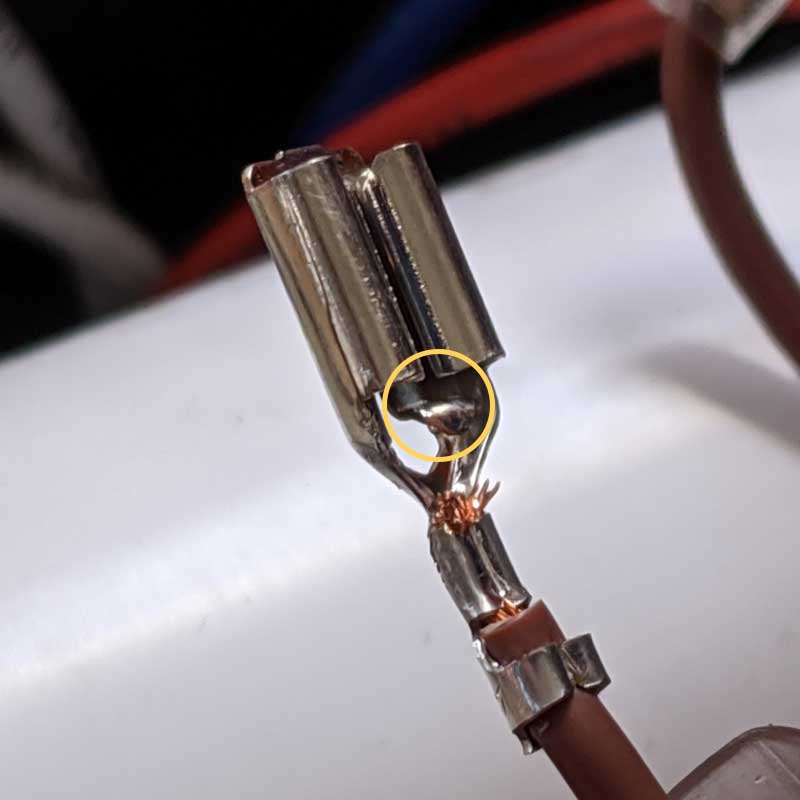
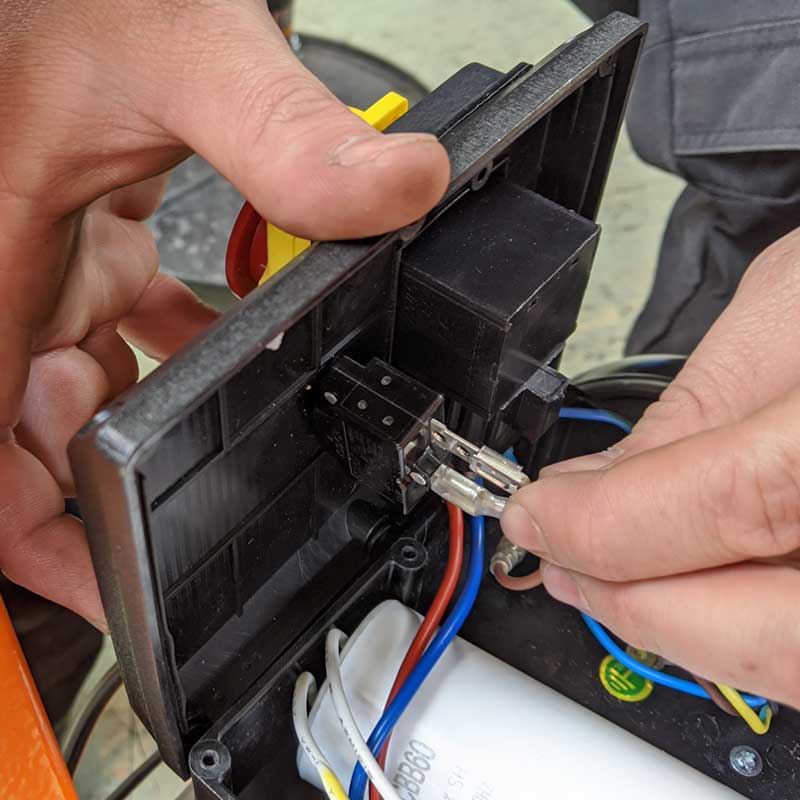
3. The next step is to remove the wires from the circuit trip, take care as one of these wires may have a small tab on the inside which will need to be pressed down in order to release the wire. It’s best to remove the plastic covers from the end of the wires in order to check for the tab.
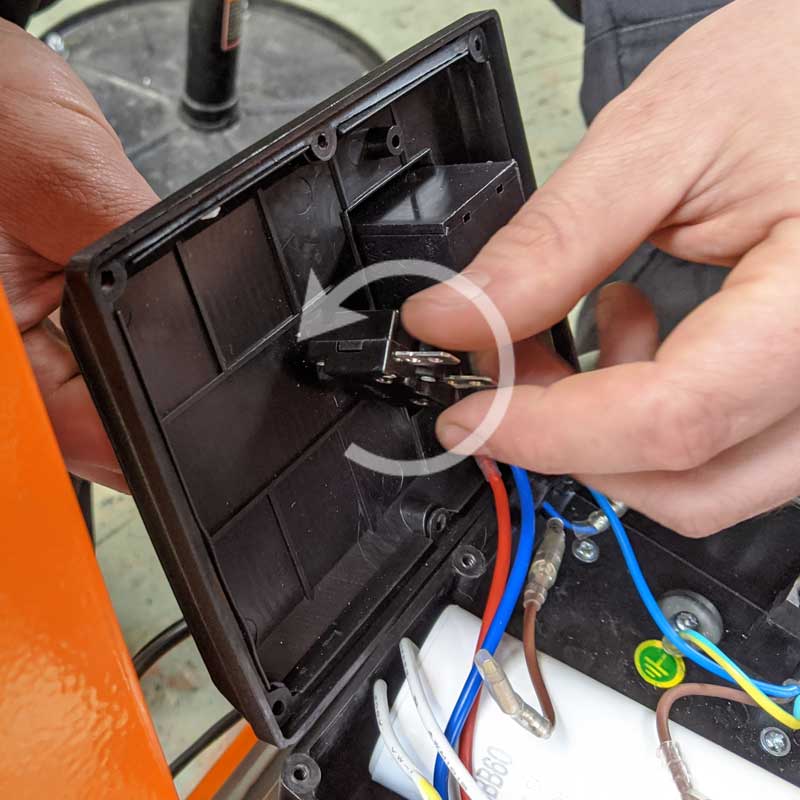
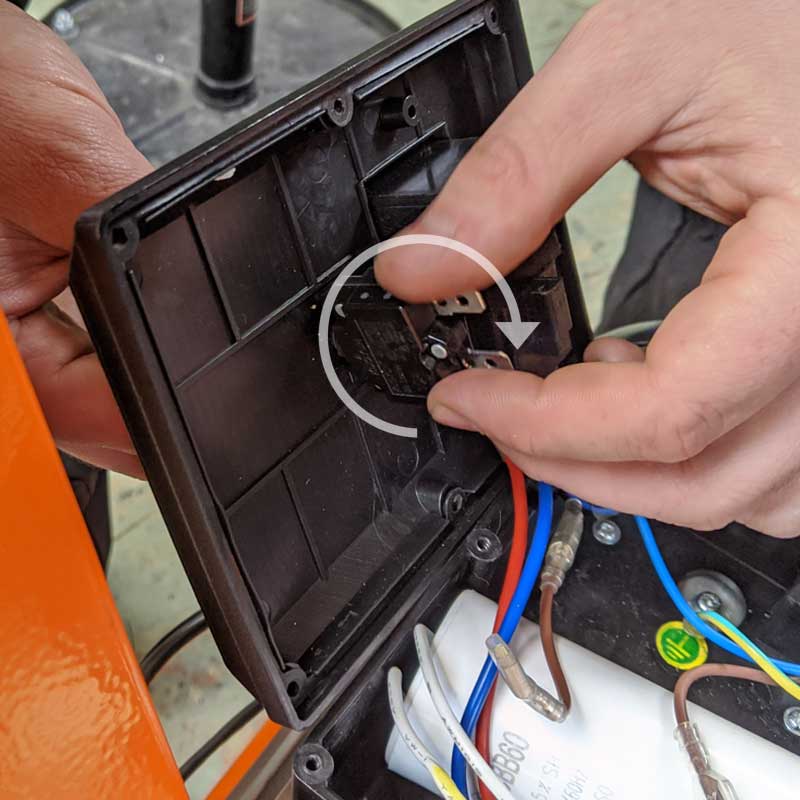
4. You can now unscrew the old circuit trip from the lid by rotating anti-clockwise. It’s best to hold onto the plastic trip on the other side of the lid in order to turn the circuit effectively.
5. When you have removed the old circuit trip, you can then install the new trip by following the same instructions but instead turning clockwise when installing.
6. Now reinstall the wires into the new circuit trip. You can install these wires in any order.
7. Finally, close the lid and screw back into place.
Last Updated on October 8, 2020 by Forest Master
- Remove the 6 screws (circled) that hold the cover of the switch box closed.
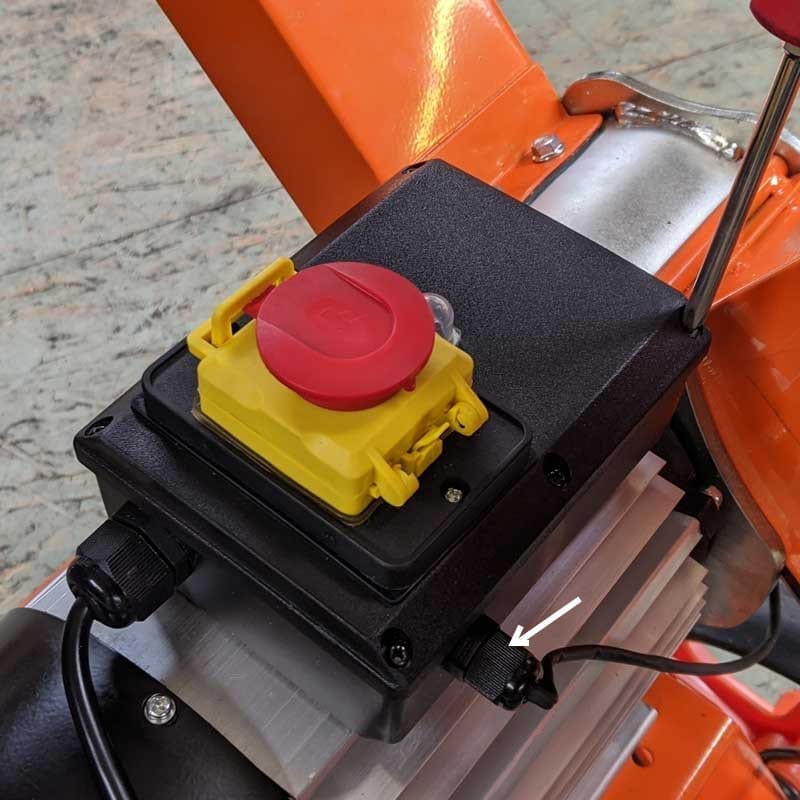
2. Disconnect the bullet connectors (arrowed) of the black and blue wires from the hopper switch.
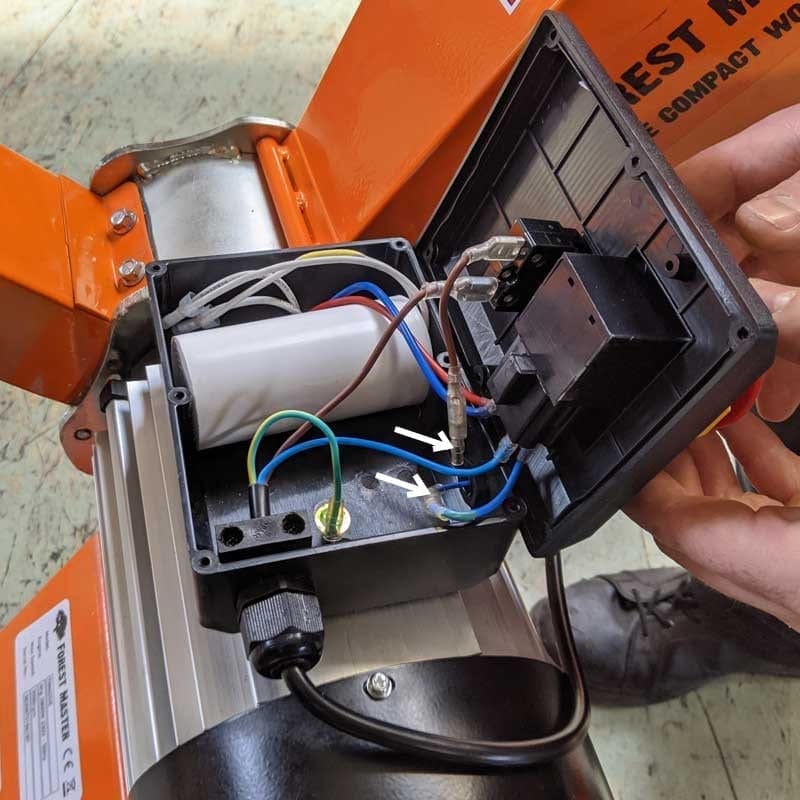
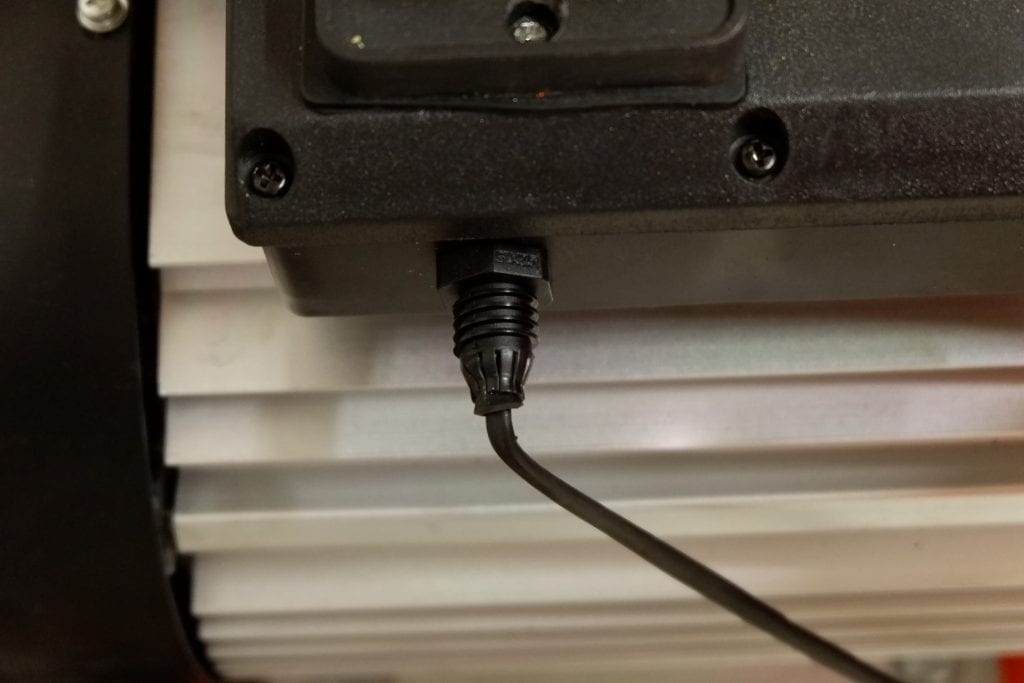
3. Unscrew the cover of the cable grommet and draw the two wires out.
4. Open the hopper and remove the two screws securing the hopper switch then remove the switch.
Fitting the new hopper switch is the reverse process.
Attach the new hopper switch.
Feed the wires through the cable grommet into the motor switch box and screw the grommet cover on.
Connect the bullet connectors. The black wire from the hopper switch goes to the brown wire. The blue wire goes to the blue wire.
Close the lid and secure the six screws.
Last Updated on October 8, 2020 by Forest Master
First, you will need to check the main supply voltage.
The extension cable you use will also have to be 2.5 cable and be used full unwound.
On average, we lose 1 volt of power for every meter of cable. So if you were to extend over 30 meters then you’re losing 30 volts of power. When a motor is designed for 230/240 volts you are overloading the motor by running it with less than 220 volts.
In the past, customers have been known to run at 200 volts with no issues but over time this can cause issues with the motor causing them to fail.
Standard household mains will typically run at around 230v/240v but it’s recommended that you check this as it’s quite possible that you’re running at a lower level.
FM6DD 6HP Petrol Wood Chipper
Last Updated on April 15, 2020 by Forest Master
The entrance leading direct to the cutter is 95 mm x 95 mm. The upper section has a CE plate fitted to restrict the size of cutting to 2 x 55mm holes with a slot joining the two holes which provides an entrance for side shoots and branches etc. The safety plate is not required for USA or Canada.
Last Updated on July 30, 2021 by Forest Master
Wood is too dried out
The compact chipper series is designed primarily for chipping freshly cut wood. The FM6DD has been tested thoroughly chipping freshly cut hawthorn wood (slow-grown hardwood).
We recommend that the wood is chipped no longer than three days after cutting. After this date, the wood will begin to dry out, meaning the chipper blades then struggle to dig into the wood. This produces a sawdust-like waste from the exit chute, and the chipper will struggle to self-feed.
If the chipper is producing sawdust – this is a clear sign that the wood is dry. When chipping slow-grown hardwood like fruit trees (such as cherry or apple trees) you must ensure that you chip the material the same day that it is cut to ensure the machine operates at full effectiveness.
Last Updated on August 10, 2021 by Forest Master
This largely depends on the hardness of the wood you’re chipping. The harder the wood, the quicker the blades will need to be replaced.
However, the chipper is equipped with twin reversible blades. The reversible blades mean that you can simply switch the blades around when the first set start to dull, so you get a much longer life span on the blades.
We also stock spare blades on our website, should you need to have them replaced.
You can also sharpen your blades using an oil stone. Simply sharpen the edges of the blade, do not worry about taking out any dents or marks.
Last Updated on July 6, 2020 by Forest Master
Both the FM6DD and the FM4DDE utilise a direct drive for performance, this means that there are no belts or chains that you need to adjust.
Last Updated on July 21, 2020 by Forest Master
In order to rotate the blades on any of our chippers, you much use a hex socket (6 sided) with no leading edge, this is important or you will round off the head.
Sometimes it helps to tighten a tiny bit before undoing the bolt.
When the process is complete, use a small amount of thread lock and screw back into position.
Last Updated on March 5, 2021 by Forest Master
Our compact chippers are built for the primary purpose of being a chipper and shredder. However, the chipper can still handle dry green waste such as laurel and conifer.
The cutting blades are set at a 0.5mm gap, these can be adjusted to be very close together which eliminates the gap for any leaves to bypass the cutting blades.
The FM6DD spins at a higher rate (3600 rpm v 2800 rpm) than the FM4DDE, the higher spin rate means that the chipper is able to produce smaller cuttings.
This machine is not capable of mulching wet green waste such as ivy or nettles, however, our mulching machine can easily mulch pretty much any material you throw at it. Take a further look at it by clicking here. FM6DD-MUL.
General Product Queries
Last Updated on July 21, 2020 by Forest Master
Replacing a plug socket fuse is a straight forward process.
– Before beginning, remove the plug from the wall and you will be able to see the cover between the terminals.
– Find a suitable screw driver and carefully remove the cover from the base of the plug.
– Remove the old fuse from the plug using a small screwdriver.
– Simply slide in the new fuse into where the old fuse previously sat and then reassemble the plug, attaching the cover back into place.
Last Updated on October 8, 2020 by Forest Master
First, you will need to check the main supply voltage.
The extension cable you use will also have to be 2.5 cable and be used full unwound.
On average, we lose 1 volt of power for every meter of cable. So if you were to extend over 30 meters then you’re losing 30 volts of power. When a motor is designed for 230/240 volts you are overloading the motor by running it with less than 220 volts.
In the past, customers have been known to run at 200 volts with no issues but over time this can cause issues with the motor causing them to fail.
Standard household mains will typically run at around 230v/240v but it’s recommended that you check this as it’s quite possible that you’re running at a lower level.
Log Splitter - Power Issues
Last Updated on October 8, 2020 by Forest Master
First, you will need to check the main supply voltage.
The extension cable you use will also have to be 2.5 cable and be used full unwound.
On average, we lose 1 volt of power for every meter of cable. So if you were to extend over 30 meters then you’re losing 30 volts of power. When a motor is designed for 230/240 volts you are overloading the motor by running it with less than 220 volts.
In the past, customers have been known to run at 200 volts with no issues but over time this can cause issues with the motor causing them to fail.
Standard household mains will typically run at around 230v/240v but it’s recommended that you check this as it’s quite possible that you’re running at a lower level.
Can’t find your question? Submit it below.

